Prisma is a next-generation ORM that can be used to access a database in Node.js and TypeScript applications. In this guide, you'll learn how to implement a sample fullstack blogging application using the following technologies:
- Next.js as the React framework
- Next.js API Routes for server-side API routes as the backend
- Prisma as the ORM for migrations and database access
- Vercel Postgres as the database
- NextAuth.js for authentication via GitHub (OAuth)
- TypeScript as the programming language
- Vercel for deployment
You'll take advantage of the flexible rendering capabilities of Next.js and at the end, you will deploy the app to Vercel.
Prerequisites
To successfully finish this guide, you'll need:
- Node.js
- A Vercel Account (to set up a free Postgres database and deploy the app)
- A GitHub Account (to create an OAuth app)
Step 1: Set up your Next.js starter project
Navigate into a directory of your choice and run the following command in your terminal to set up a new Next.js project with the pages router:
npx create-next-app --example https://github.com/prisma/blogr-nextjs-prisma/tree/main blogr-nextjs-prismaYou can now navigate into the directory and launch the app:
cd blogr-nextjs-prisma && npm run devHere's what it looks like at the moment:
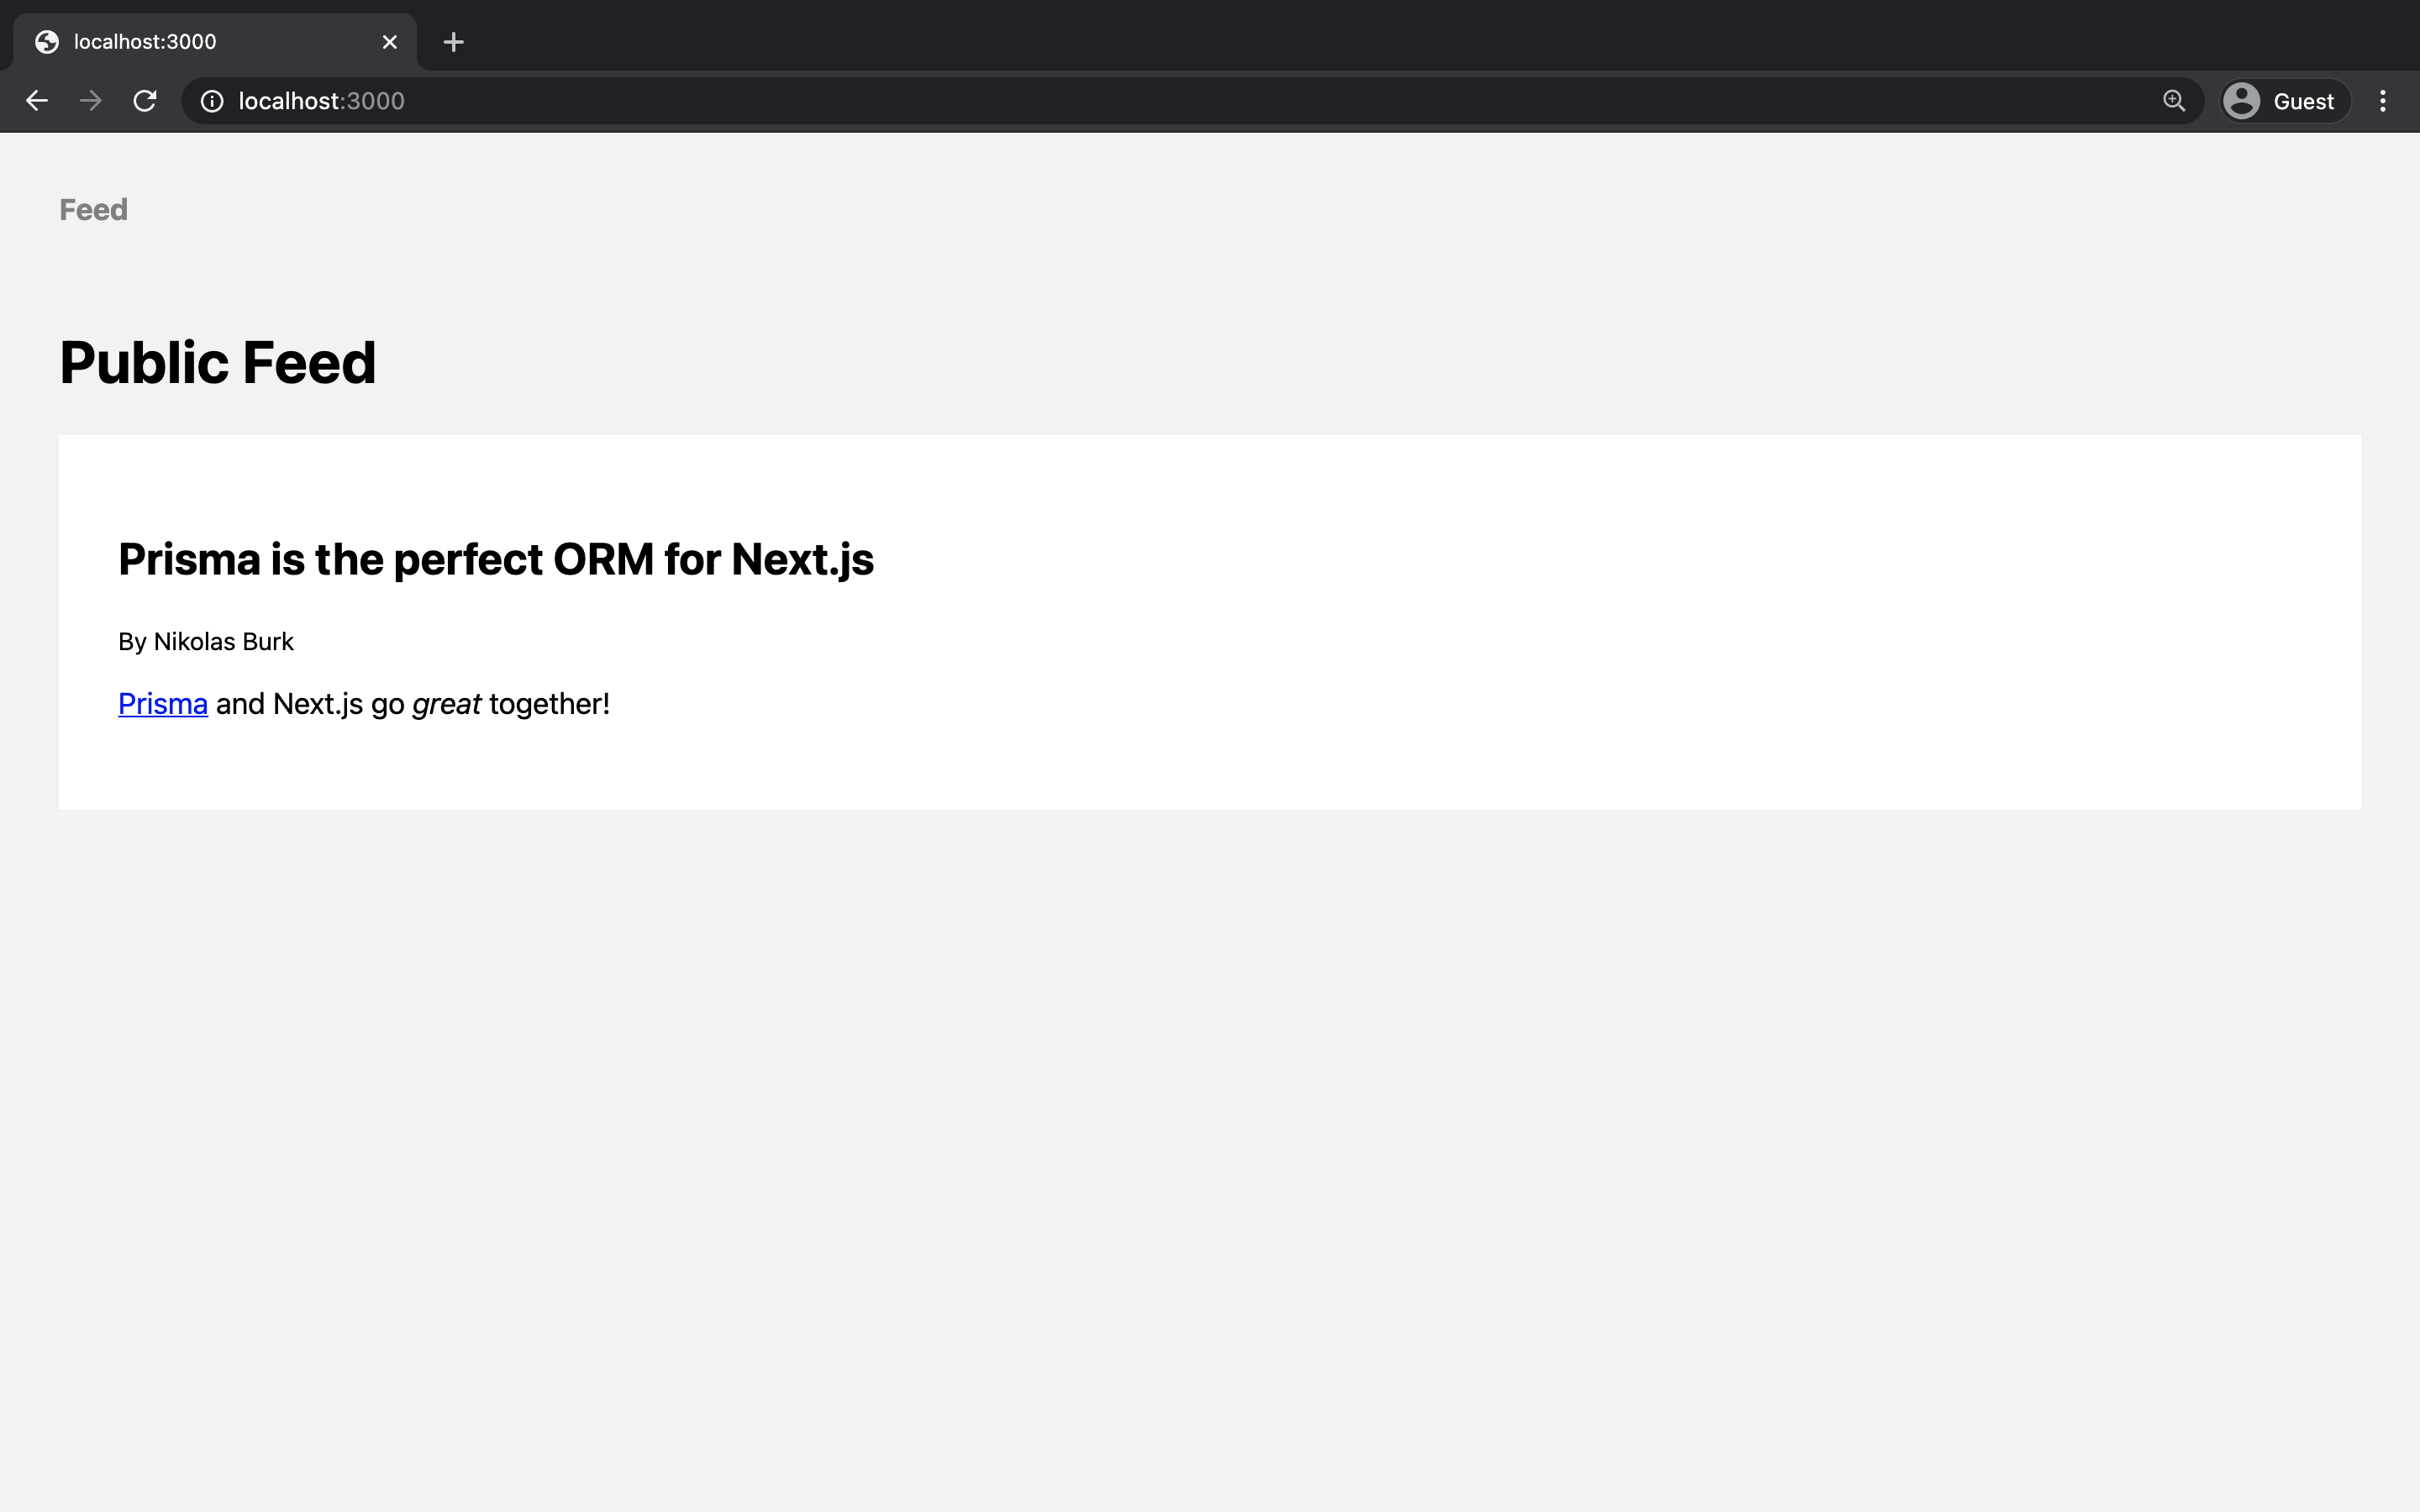
The app currently displays hardcoded data that's returned from getStaticProps in the index.tsx file. Over the course of the next few sections, you'll change this so that the data is returned from an actual database.
Step 2: Set up your Vercel Postgres database
For the purpose of this guide, we'll use a free Postgres database hosted on Vercel. First, push the repo you cloned in Step 1 to our own GitHub and deploy it to Vercel to create a Vercel project.
Once you have a Vercel project, select the Storage tab, then select the Connect Database button. Under the Create New tab, select Postgres and then the Continue button.
To create a new database, do the following in the dialog that opens:
- Enter
sample_postgres_db(or any other name you wish) under Store Name. The name can only contain alphanumeric letters, "_" and "-" and can't exceed 32 characters. - Select a region. We recommend choosing a region geographically close to your function region (defaults to US East) for reduced latency.
- Click Create.
Our empty database is created in the region specified. Because you created the Postgres database in a project, we automatically created and added the following environment variables to the project for you.
After running npm i -g vercel@latest to install the Vercel CLI, pull down the latest environment variables to get your local project working with the Postgres database.
vercel env pull .envWe now have a fully functioning Vercel Postgres database and have all the environment variables to run it locally and on Vercel.
Step 3: Setup Prisma and create the database schema
Next, you will set up Prisma and connect it to your PostgreSQL database. Start by installing the Prisma CLI via npm:
npm install prisma --save-devYou'll now create the tables in your database using the Prisma CLI.
To do this, create a prisma folder and add a file called schema.prisma, your main Prisma configuration file that will contain your database schema.
Add the following model definitions to your schema.prisma so that it looks like this:
// schema.prisma
generator client {  provider = "prisma-client-js"}
datasource db {  provider = "postgresql"  url = env("POSTGRES_PRISMA_URL") // uses connection pooling  directUrl = env("POSTGRES_URL_NON_POOLING") // uses a direct connection}
model Post {  id        String     @default(cuid()) @id  title     String  content   String?  published Boolean @default(false)  author    User?   @relation(fields: [authorId], references: [id])  authorId  String?}
model User { id String @default(cuid()) @id name String? email String? @unique createdAt DateTime @default(now()) @map(name: "created_at") updatedAt DateTime @updatedAt @map(name: "updated_at") posts Post[] @@map(name: "users")}This Prisma schema defines two models, each of which will map to a table in the underlying database: User and Post. Notice that there's also a relation (one-to-many) between the two models, via the author field on Post and the posts field on User.
To actually create the tables in your database, you now can use the following command of the Prisma CLI:
npx prisma db pushYou should see the following output:
Environment variables loaded from /Users/nikolasburk/Desktop/nextjs-guide/blogr-starter/.env.development.localPrisma schema loaded from prisma/schema.prisma
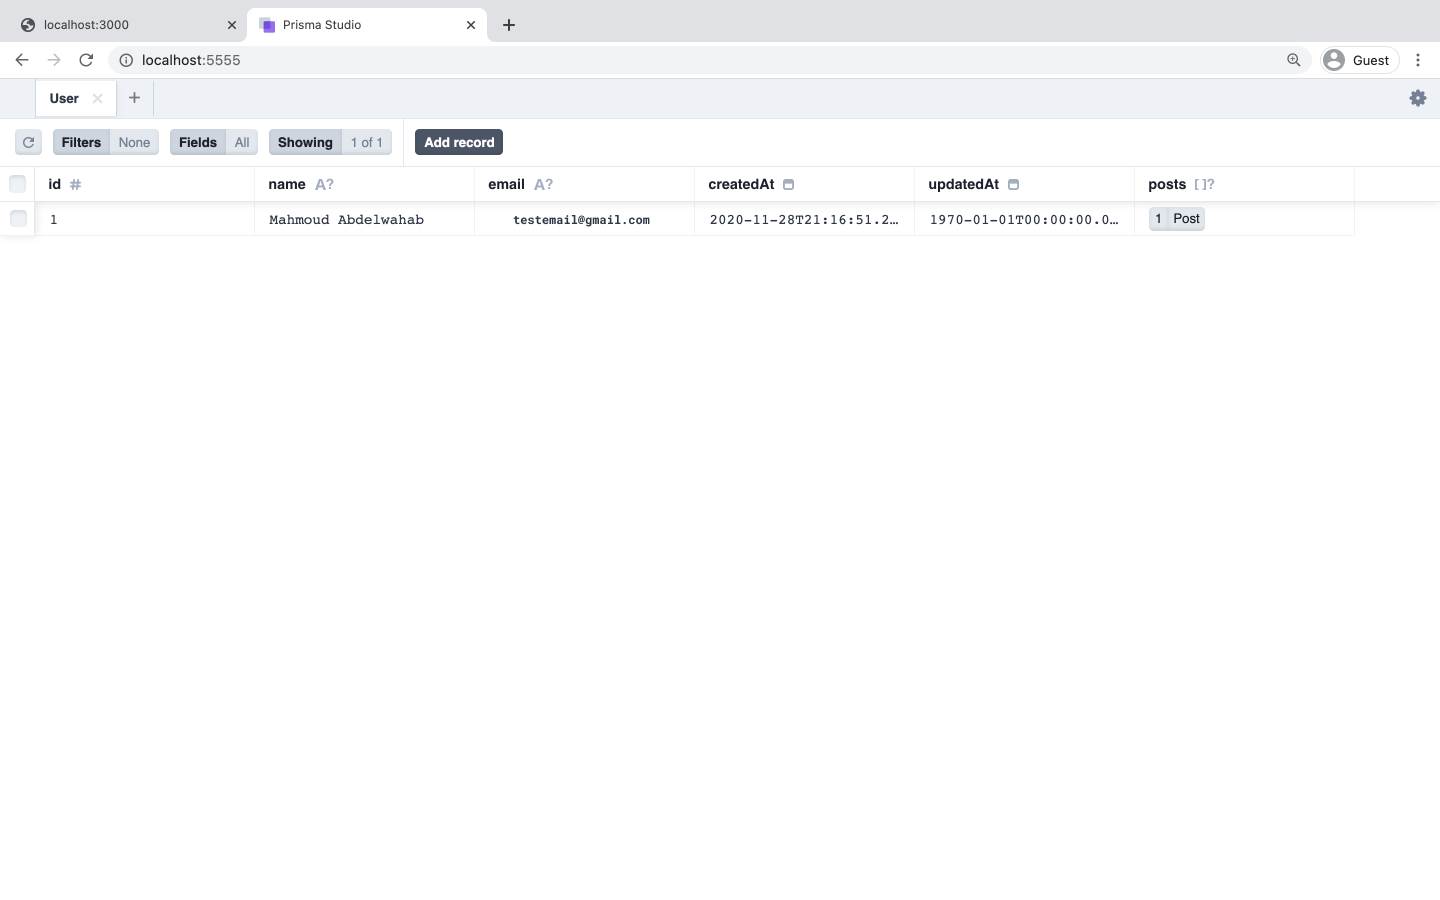
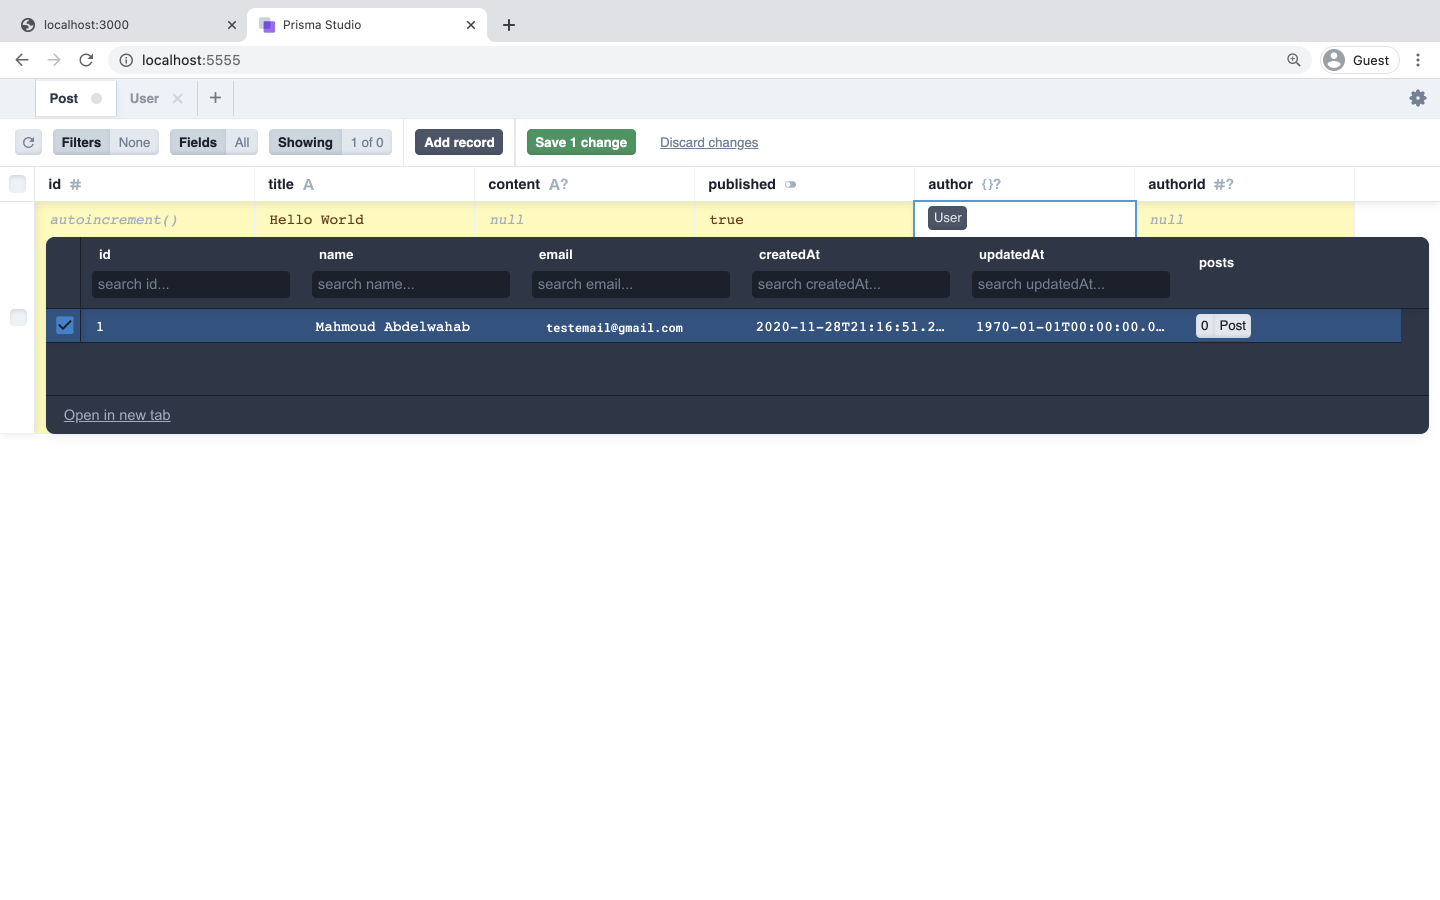
🚀 Your database is now in sync with your schema. Done in 2.10sCongratulations, the tables have been created! Go ahead and add some initial dummy data using Prisma Studio. Run the following command:
npx prisma studioUse Prisma Studio's interface to create a new User and Post record and connect them via their relation fields.
Step 4. Install and generate Prisma Client
Before you can access your database from Next.js using Prisma, you first need to install Prisma Client in your app. You can install it via npm as follows:
npm install @prisma/clientBecause Prisma Client is tailored to your own schema, you need to update it every time your Prisma schema file is changing by running the following command:
npx prisma generateYou'll use a single PrismaClient instance that you can import into any file where it's needed. The instance will be created in a prisma.ts file inside the lib/ directory. Go ahead and create the missing directory and file:
mkdir lib && touch lib/prisma.tsNow, add the following code to this file:
import { PrismaClient } from '@prisma/client';
let prisma: PrismaClient;
if (process.env.NODE_ENV === 'production') {  prisma = new PrismaClient();} else {  if (!global.prisma) {    global.prisma = new PrismaClient();  }  prisma = global.prisma;}
export default prisma;Now, whenever you need access to your database you can import the prisma instance into the file where it's needed.
Step 5. Update the existing views to load data from the database
The blog post feed that's implemented in pages/index.tsx and the post detail view in pages/p/[id].tsx are currently returning hardcoded data. In this step, you'll adjust the implementation to return data from the database using Prisma Client.
Open pages/index.tsx and add the following code right below the existing import declarations:
import prisma from '../lib/prisma';Your prisma instance will be your interface to the database when you want to read and write data in it. You can for example create a new User record by calling prisma.user.create() or retrieve all the Post records from the database with prisma.post.findMany(). For an overview of the full Prisma Client API, visit the Prisma docs.
Now you can replace the hardcoded feed object in getStaticProps inside index.tsx with a proper call to the database:
export const getStaticProps: GetStaticProps = async () => { const feed = await prisma.post.findMany({ where: { published: true }, include: { author: { select: { name: true }, }, }, }); return { props: { feed }, revalidate: 10, };};The two things to note about the Prisma Client query:
- A
wherefilter is specified to include onlyPostrecords wherepublishedistrue - The
nameof theauthorof thePostrecord is queried as well and will be included in the returned objects
Before running the app, head over to /pages/p/[id].tsx and adjust the implementation there as well to read the correct Post record from the database.
This page uses getServerSideProps (SSR) instead of getStaticProps (SSG). This is because the data is dynamic, it depends on the id of the Post that's requested in the URL. For example, the view on route /p/42 displays the Post where the id is 42.
Like before, you first need to import Prisma Client on the page:
import prisma from '../../lib/prisma';Now you can update the implementation of getServerSideProps to retrieve the proper post from the database and make it available to your frontend via the component's props:
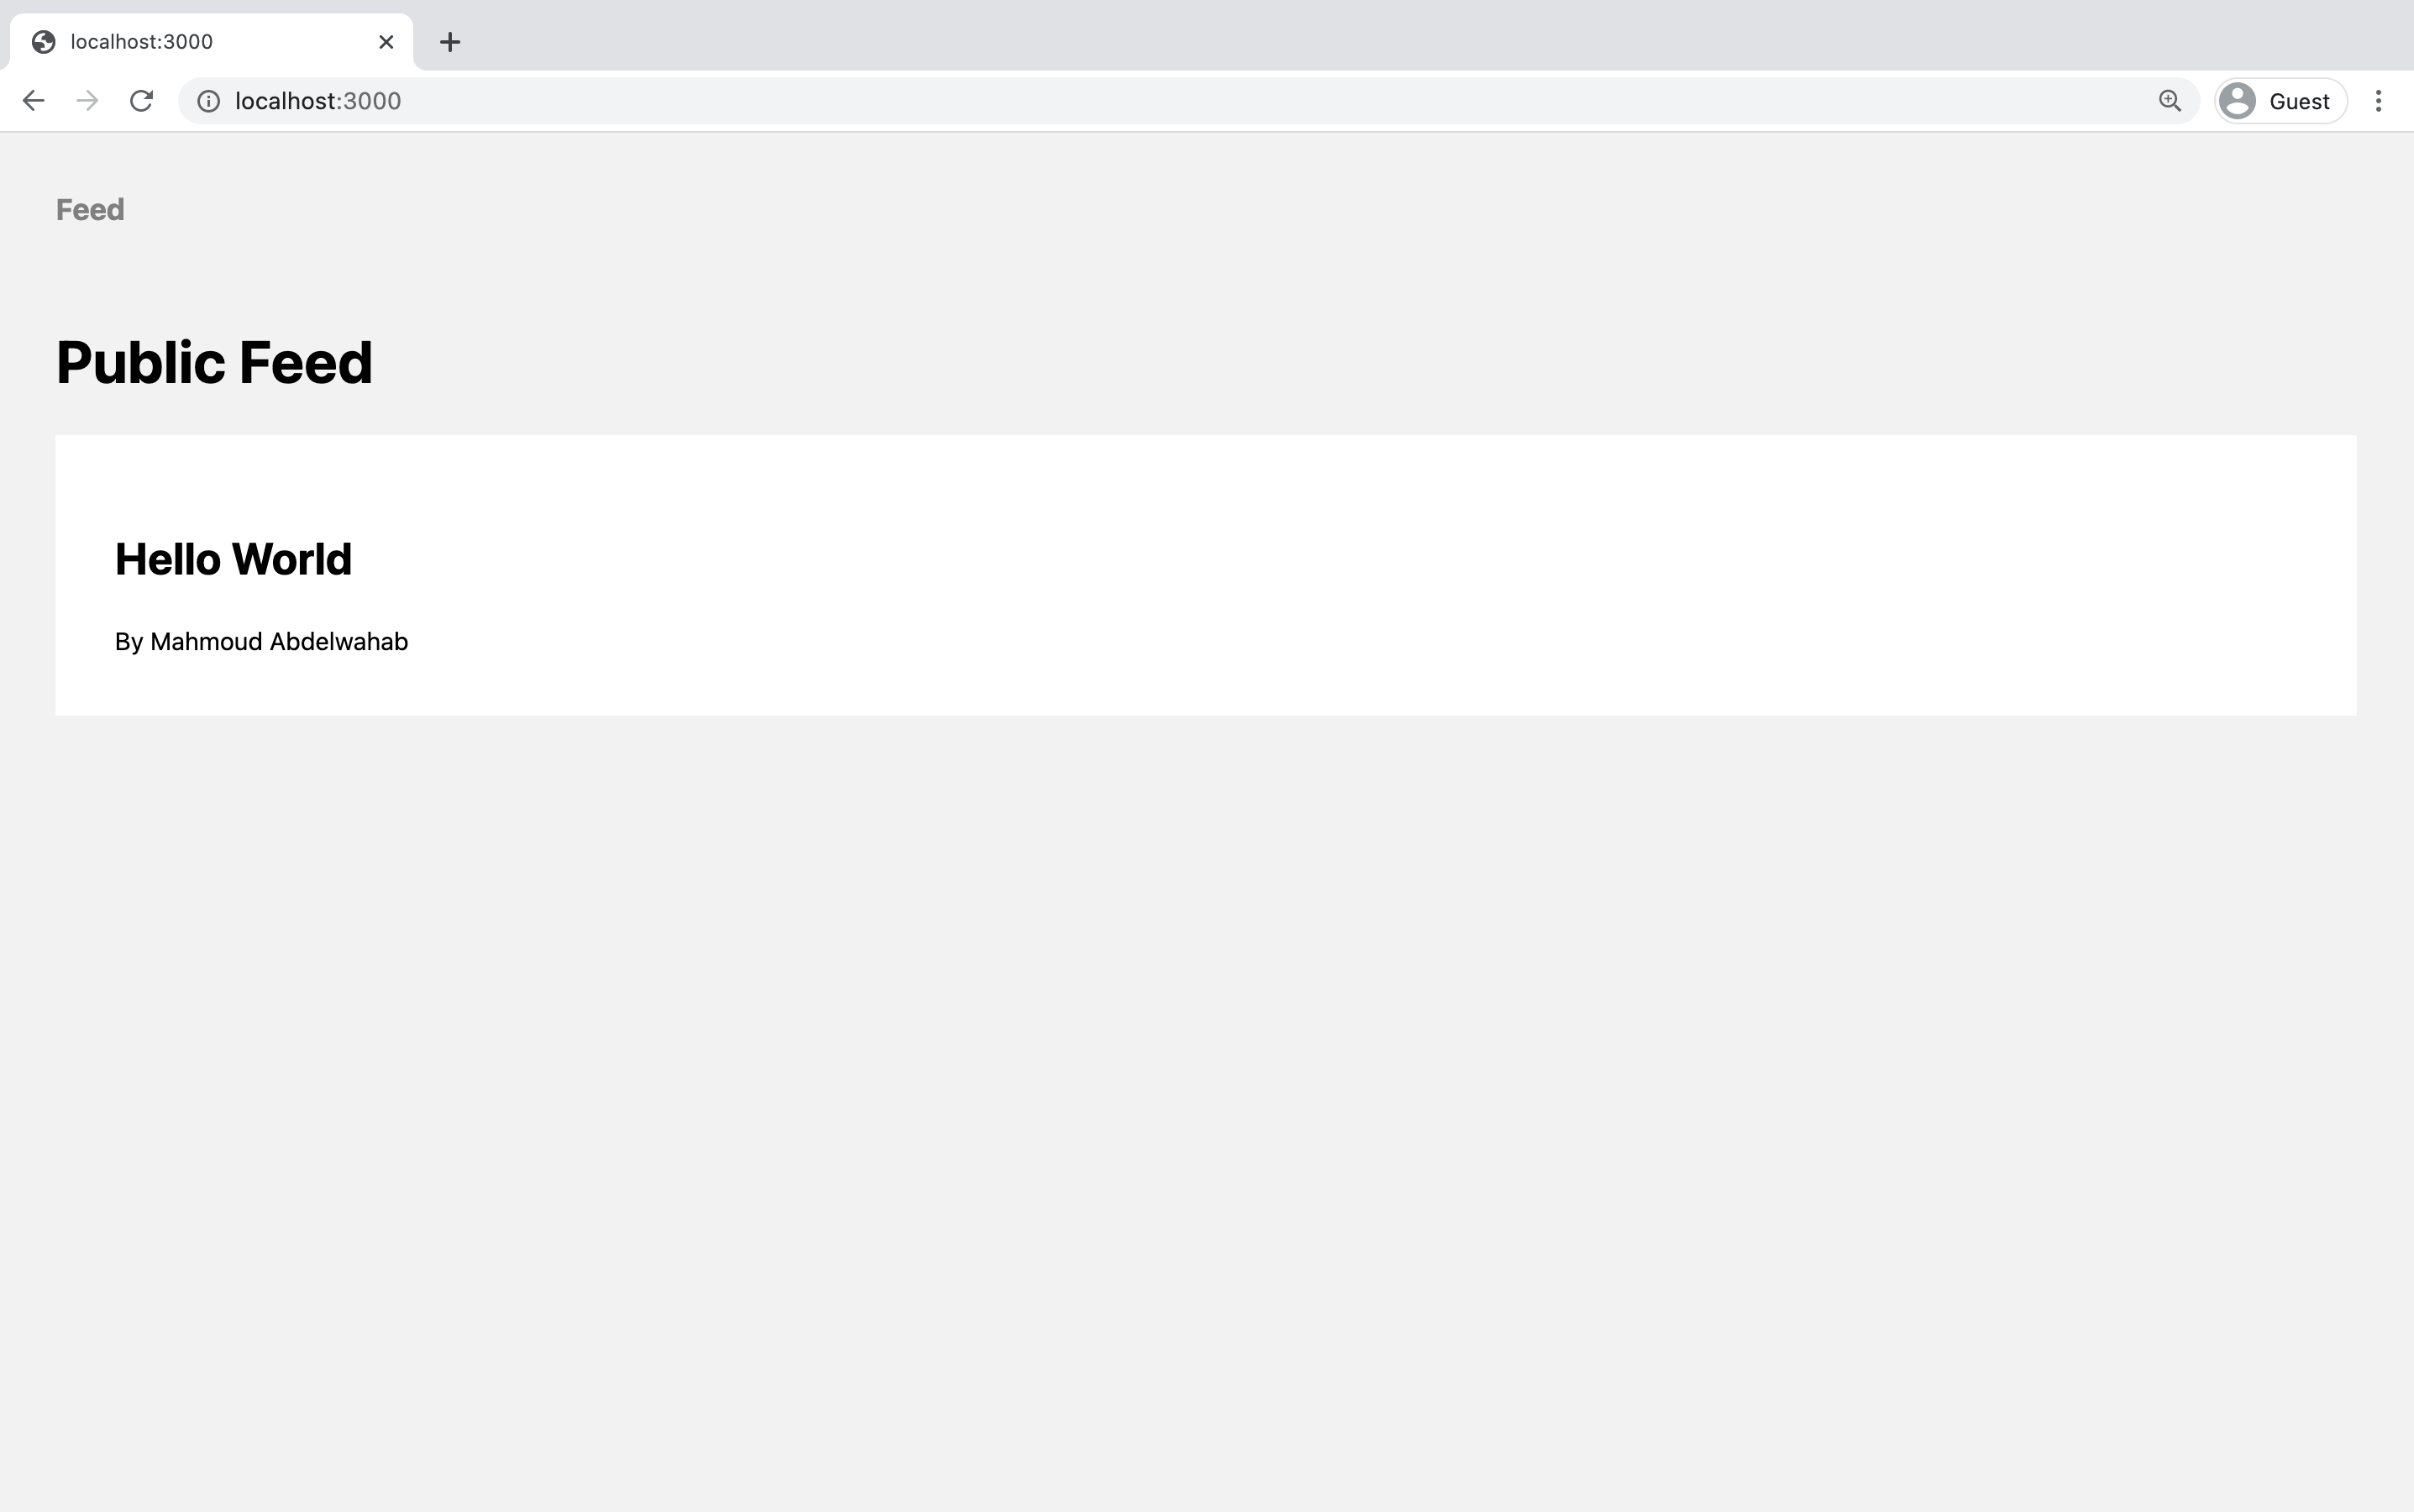
export const getServerSideProps: GetServerSideProps = async ({ params }) => { const post = await prisma.post.findUnique({ where: { id: String(params?.id), }, include: { author: { select: { name: true }, }, }, }); return { props: post, };};That's it! If your app is not running any more, you can restart it with the following command:
npm run devOtherwise, save the files and open the app at http://localhost:3000 in your browser. The Post record will be displayed as follows:
You can also click on the post to navigate to its detail view.
Step 6. Set up GitHub authentication with NextAuth
In this step, you will add GitHub authentication to the app. Once that functionality is available, you'll add more features to the app, such that authenticated users can create, publish and delete posts via the UI.
As a first step, go ahead and install the NextAuth.js library in your app:
npm install next-auth@4 @next-auth/prisma-adapterNext, you need to change your database schema to add the missing tables that are required by NextAuth.
To change your database schema, you can manually make changes to your Prisma schema and then run the prisma db push command again. Open schema.prisma and adjust the models in it to look as follows:
// schema.prisma
model Post {  id        String  @id @default(cuid())  title     String  content   String?  published Boolean @default(false)  author    User?@relation(fields:[authorId], references:[id])  authorId  String?}
model Account {  id                 String  @id @default(cuid())  userId             String  @map("user_id")  type               String  provider           String  providerAccountId  String  @map("provider_account_id")  refresh_token      String?  access_token       String?  expires_at         Int?  token_type         String?  scope              String?  id_token           String?  session_state      String?  oauth_token_secret String?  oauth_token        String?
  user User @relation(fields:[userId], references:[id], onDelete: Cascade)
  @@unique([provider, providerAccountId])}
model Session {  id           String   @id @default(cuid())  sessionToken String   @unique@map("session_token")  userId       String   @map("user_id")  expires      DateTime  user         User     @relation(fields:[userId], references:[id], onDelete: Cascade)}
model User {  id            String    @id @default(cuid())  name          String?  email         String?@unique  emailVerified DateTime?  image         String?  posts         Post[]  accounts      Account[]  sessions      Session[]}
model VerificationToken {  id         Int      @id @default(autoincrement())  identifier String  token      String   @unique  expires    DateTime
@@unique([identifier, token])}}To learn more about these models, visit the NextAuth.js docs.
Now you can adjust your database schema by creating the actual tables in the database. Run the following command:
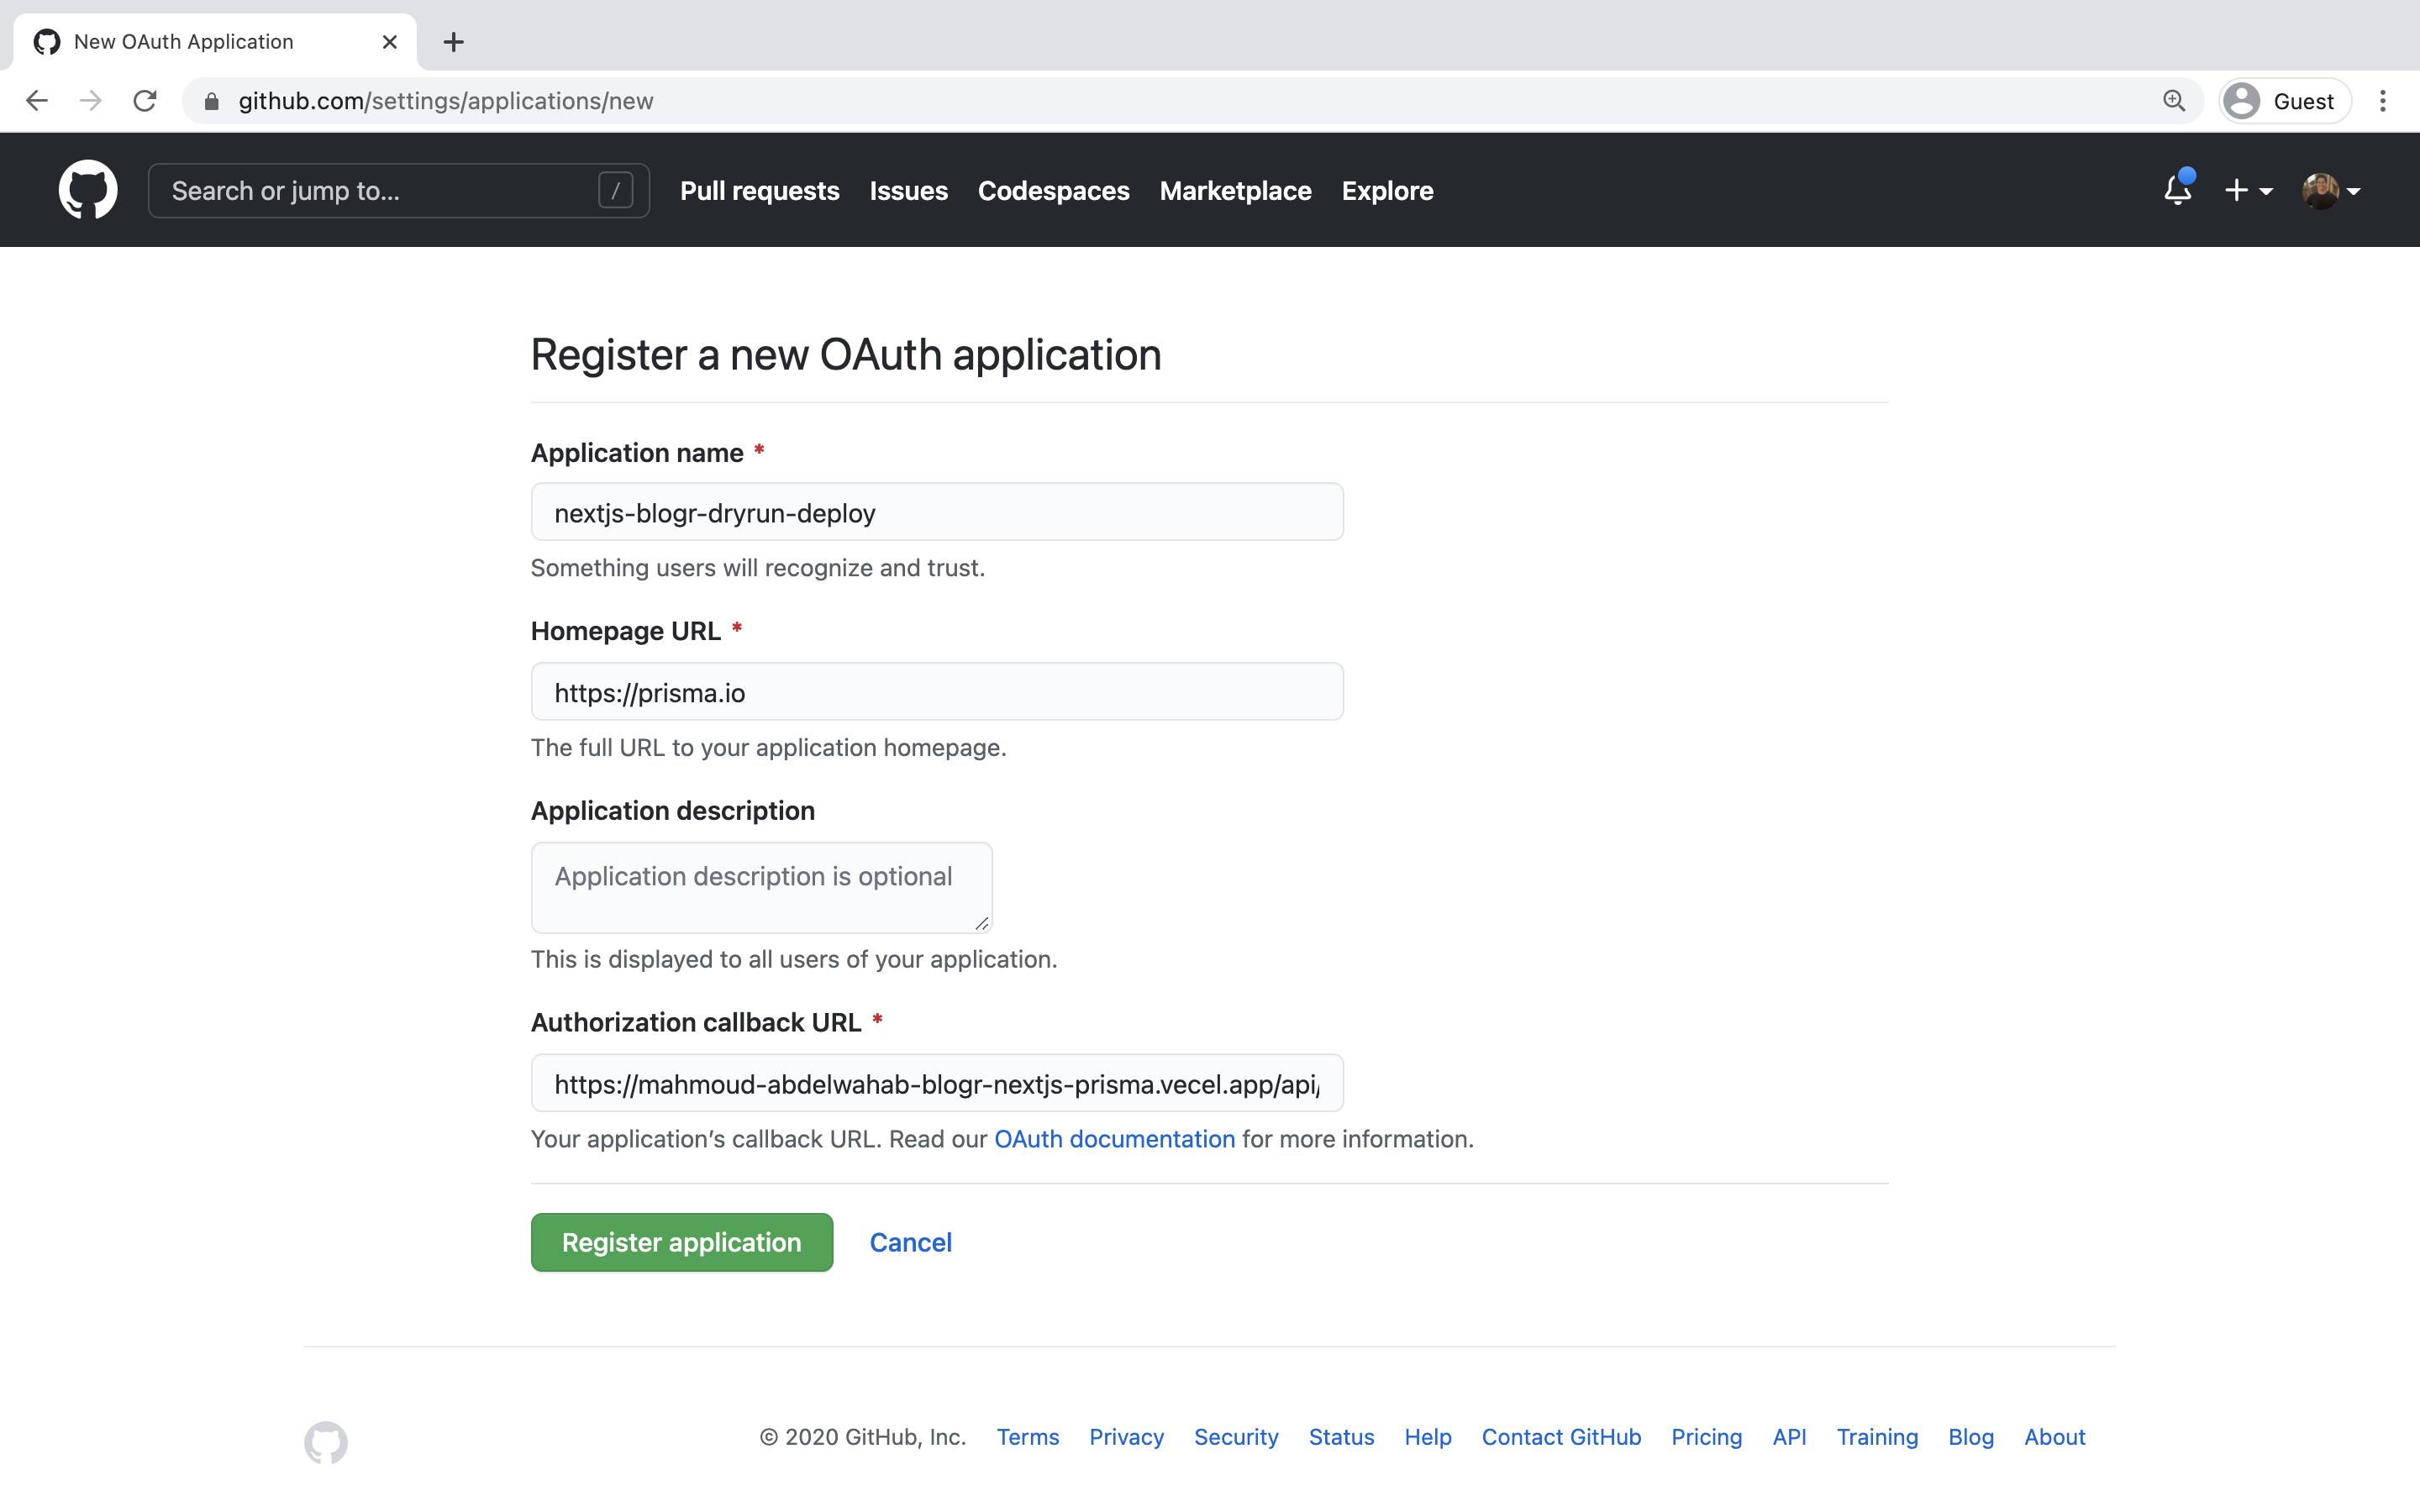
npx prisma db pushSince you're using GitHub authentication, you also need to create a new OAuth app on GitHub. First, log into your GitHub account. Then, navigate to Settings, then open to Developer Settings, then switch to OAuth Apps.
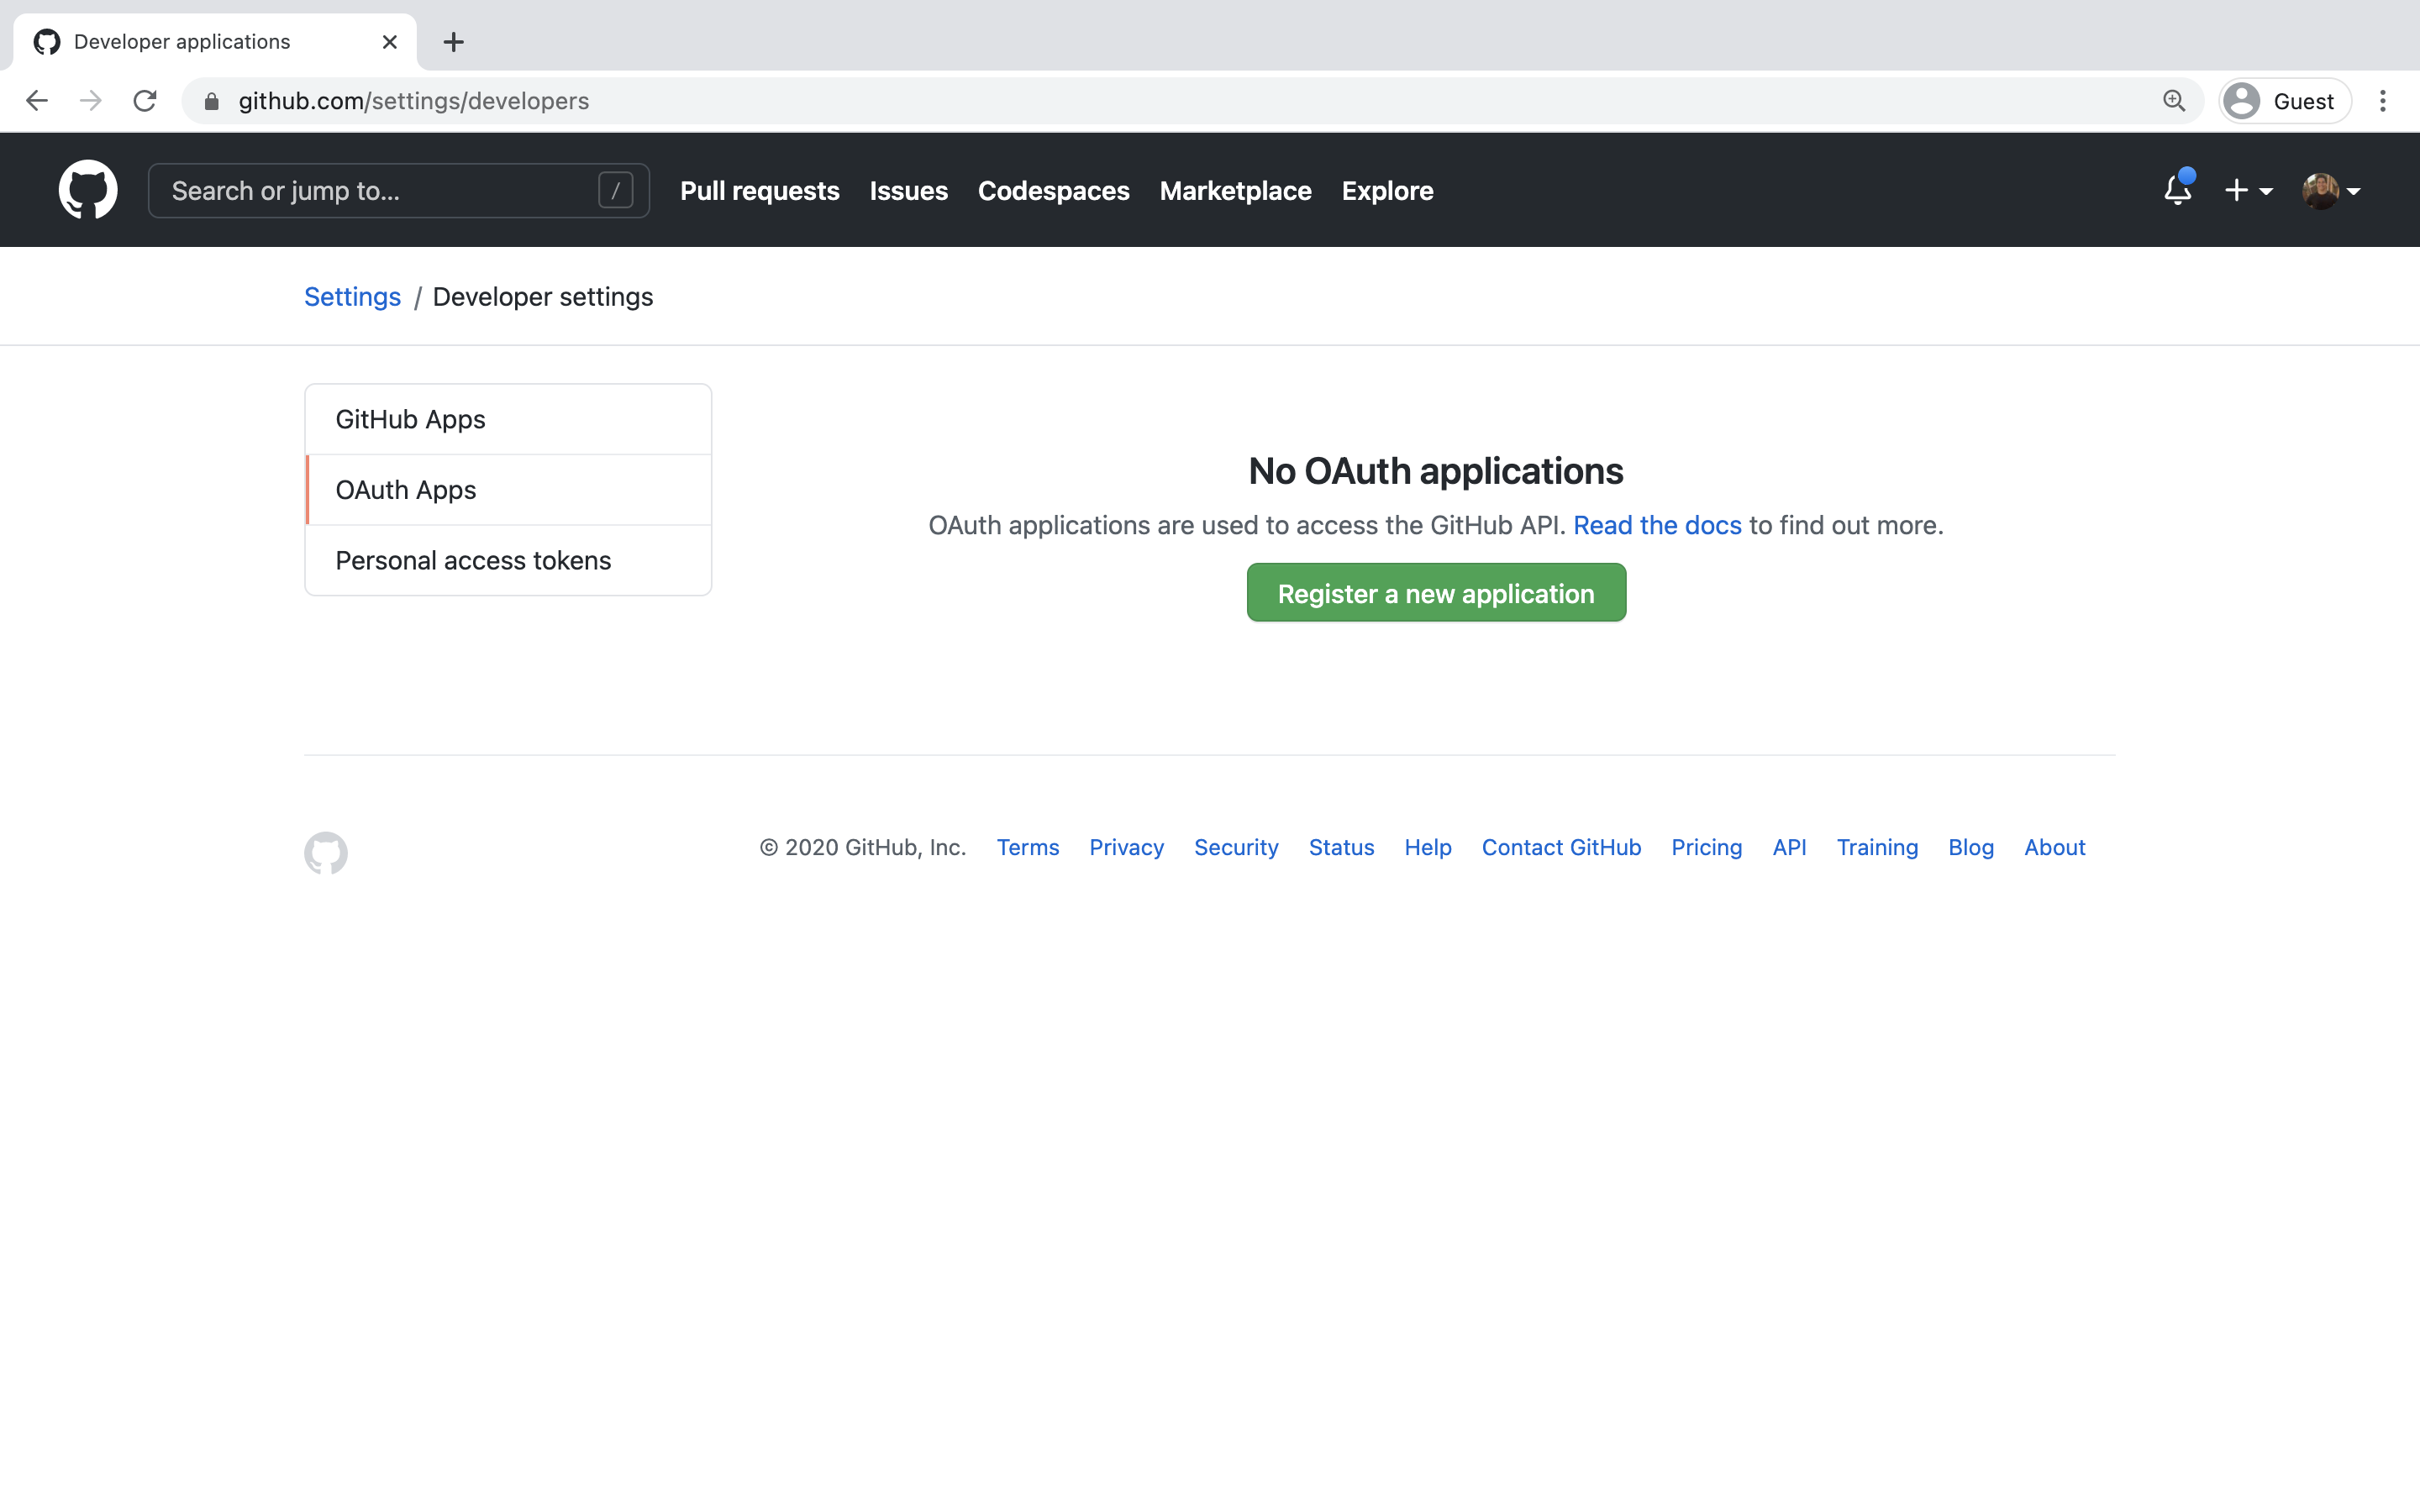
Clicking on the Register a new application (or New OAuth App) button will redirect you to a registration form to fill out some information for your app. The Authorization callback URL should be the Next.js /api/auth route: http://localhost:3000/api/auth.
An important thing to note here is that the Authorization callback URL field only supports a single URL, unlike e.g. Auth0, which allows you to add additional callback URLs separated with a comma. This means if you want to deploy your app later with a production URL, you will need to set up a new GitHub OAuth app.

Click on the Register application button, and then you will be able to find your newly generated Client ID and Client Secret. Copy and paste this info into the .env file in the root directory as the GITHUB_ID and GITHUB_SECRET env vars. Also set the NEXTAUTH_URL to the same value of the Authorization callback URL thar you configured on GitHub: http://localhost:3000/api/auth
# .env
# GitHub OAuthGITHUB_ID=6bafeb321963449bdf51GITHUB_SECRET=509298c32faa283f28679ad6de6f86b2472e1bffNEXTAUTH_URL=http://localhost:3000/api/authYou will also need to persist a user's authentication state across the entire application. Make a quick change in your application's root file _app.tsx and wrap your current root component with a SessionProvider from the next-auth/react package. Open the file and replace its current contents with the following code:
import { SessionProvider } from 'next-auth/react';import { AppProps } from 'next/app';
const App = ({ Component, pageProps }: AppProps) => {  return (    <SessionProvider session={pageProps.session}>      <Component {...pageProps} />    </SessionProvider>  );};
export default App;Step 7. Add Log In functionality
The login button and some other UI components will be added to the Header.tsx file. Open the file and paste the following code into it:
import React from 'react';import Link from 'next/link';import { useRouter } from 'next/router';import { signOut, useSession } from 'next-auth/react';
const Header: React.FC = () => {  const router = useRouter();  const isActive: (pathname: string) => boolean = (pathname) =>    router.pathname === pathname;
  const { data: session, status } = useSession();
  let left = (    <div className="left">      <Link href="/">        <a className="bold" data-active={isActive('/')}>          Feed        </a>      </Link>      <style jsx>{`        .bold {          font-weight: bold;        }
        a {          text-decoration: none;          color: var(--geist-foreground);          display: inline-block;        }
        .left a[data-active='true'] {          color: gray;        }
        a + a {          margin-left: 1rem;        }      `}</style>    </div>  );
  let right = null;
  if (status === 'loading') {    left = (      <div className="left">        <Link href="/">          <a className="bold" data-active={isActive('/')}>            Feed          </a>        </Link>        <style jsx>{`          .bold {            font-weight: bold;          }
          a {            text-decoration: none;            color: var(--geist-foreground);            display: inline-block;          }
          .left a[data-active='true'] {            color: gray;          }
          a + a {            margin-left: 1rem;          }        `}</style>      </div>    );    right = (      <div className="right">        <p>Validating session ...</p>        <style jsx>{`          .right {            margin-left: auto;          }        `}</style>      </div>    );  }
  if (!session) {    right = (      <div className="right">        <Link href="/api/auth/signin">          <a data-active={isActive('/signup')}>Log in</a>        </Link>        <style jsx>{`          a {            text-decoration: none;            color: var(--geist-foreground);            display: inline-block;          }
          a + a {            margin-left: 1rem;          }
          .right {            margin-left: auto;          }
          .right a {            border: 1px solid var(--geist-foreground);            padding: 0.5rem 1rem;            border-radius: 3px;          }        `}</style>      </div>    );  }
  if (session) {    left = (      <div className="left">        <Link href="/">          <a className="bold" data-active={isActive('/')}>            Feed          </a>        </Link>        <Link href="/drafts">          <a data-active={isActive('/drafts')}>My drafts</a>        </Link>        <style jsx>{`          .bold {            font-weight: bold;          }
          a {            text-decoration: none;            color: var(--geist-foreground);            display: inline-block;          }
          .left a[data-active='true'] {            color: gray;          }
          a + a {            margin-left: 1rem;          }        `}</style>      </div>    );    right = (      <div className="right">        <p>          {session.user.name} ({session.user.email})        </p>        <Link href="/create">          <button>            <a>New post</a>          </button>        </Link>        <button onClick={() => signOut()}>          <a>Log out</a>        </button>        <style jsx>{`          a {            text-decoration: none;            color: var(--geist-foreground);            display: inline-block;          }
          p {            display: inline-block;            font-size: 13px;            padding-right: 1rem;          }
          a + a {            margin-left: 1rem;          }
          .right {            margin-left: auto;          }
          .right a {            border: 1px solid var(--geist-foreground);            padding: 0.5rem 1rem;            border-radius: 3px;          }
          button {            border: none;          }        `}</style>      </div>    );  }
  return (    <nav>      {left}      {right}      <style jsx>{`        nav {          display: flex;          padding: 2rem;          align-items: center;        }      `}</style>    </nav>  );};
export default Header;Here's an overview of how the header is going to render:
- If no user is authenticated, a Log in button will be shown.
- If a user is authenticated, My drafts, New Post and Log out buttons will be shown.
You can already run the app to validate that this works by running npm run dev, you'll find that the Log in button is now shown. However, if you click it, it does navigate you to http://localhost:3000/api/auth/signin but Next.js is going to render a 404 page for you.
That's because NextAuth.js requires you to set up a specific route for authentication. You'll do that next.
Create a new directory and a new file in the pages/api directory:
mkdir -p pages/api/auth && touch pages/api/auth/[...nextauth].tsIn this new pages/api/auth/[...nextauth].ts file, you now need to add the following boilerplate to configure your NextAuth.js setup with your GitHub OAuth credentials and the Prisma adapter:
import { NextApiHandler } from 'next';import NextAuth from 'next-auth';import { PrismaAdapter } from '@next-auth/prisma-adapter';import GitHubProvider from 'next-auth/providers/github';import prisma from '../../../lib/prisma';
const authHandler: NextApiHandler = (req, res) => NextAuth(req, res, options);export default authHandler;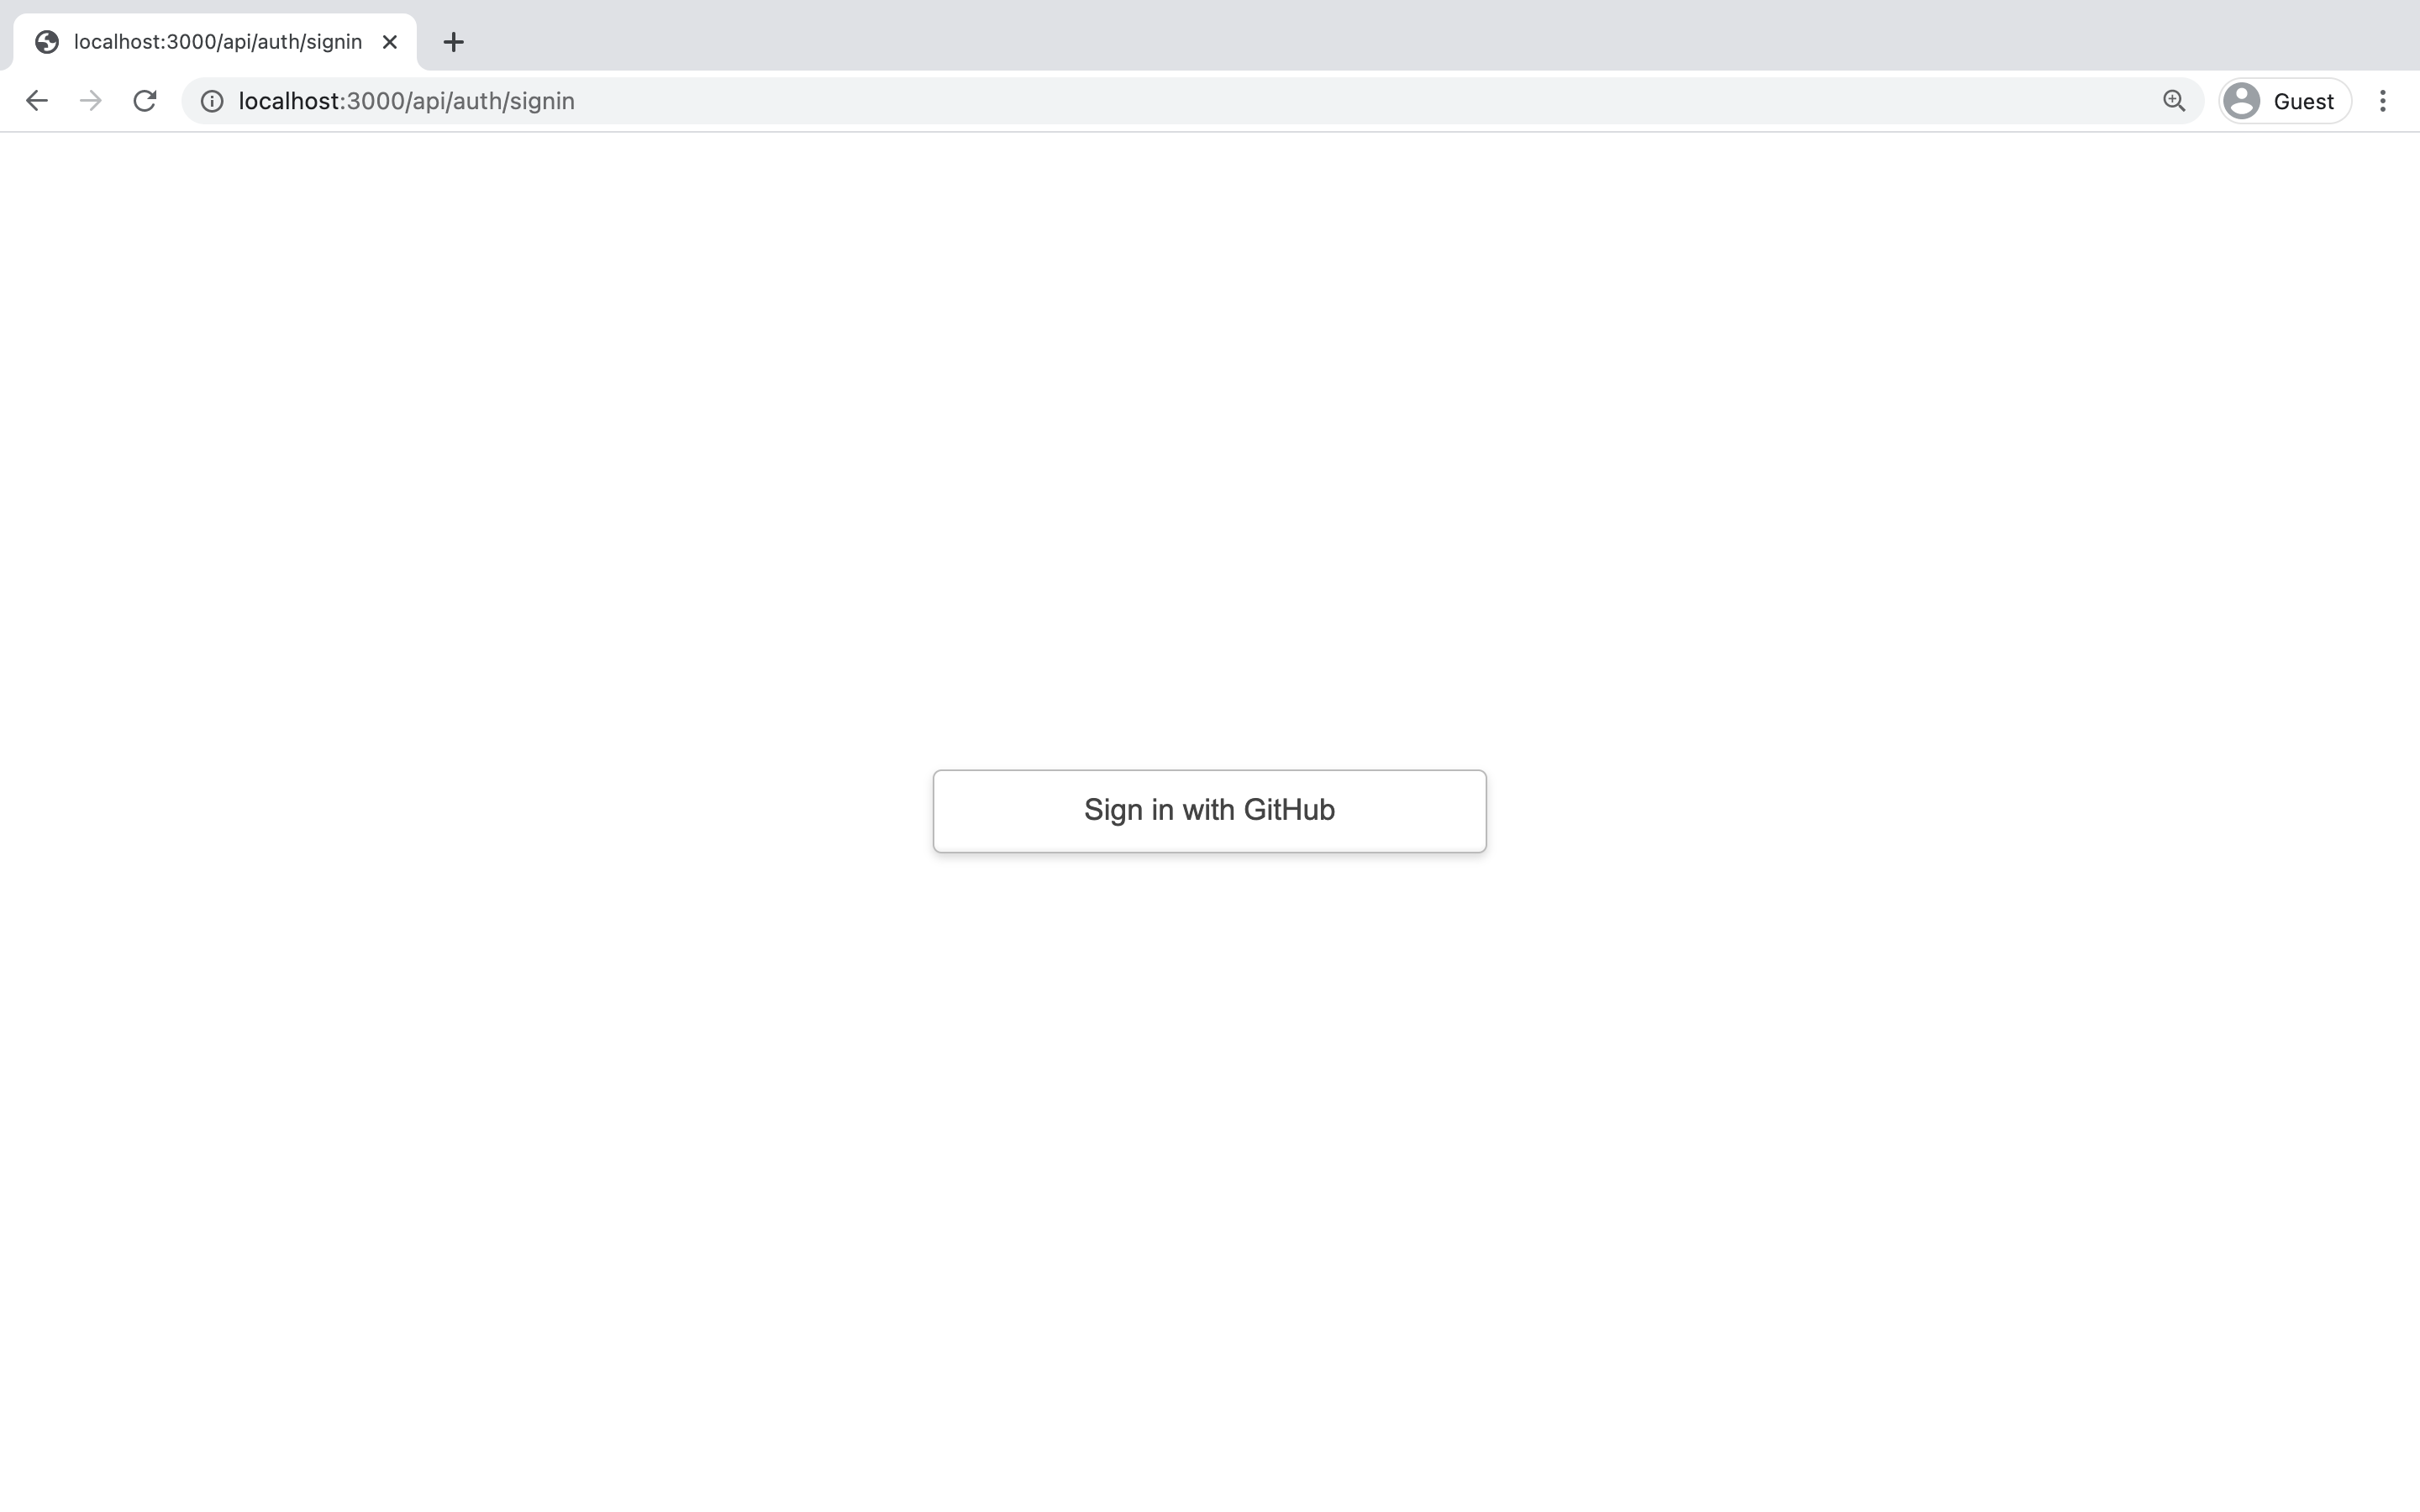
const options = { providers: [ GitHubProvider({ clientId: process.env.GITHUB_ID, clientSecret: process.env.GITHUB_SECRET, }), ], adapter: PrismaAdapter(prisma), secret: process.env.SECRET,};Once the code is added, you can navigate to http://localhost:3000/api/auth/signin again. This time, the Sign in with GitHub button is shown.
If you click it, you're forwarded to GitHub, where you can authenticate with your GitHub credentials. Once the authentication is done, you'll be redirected back into the app.
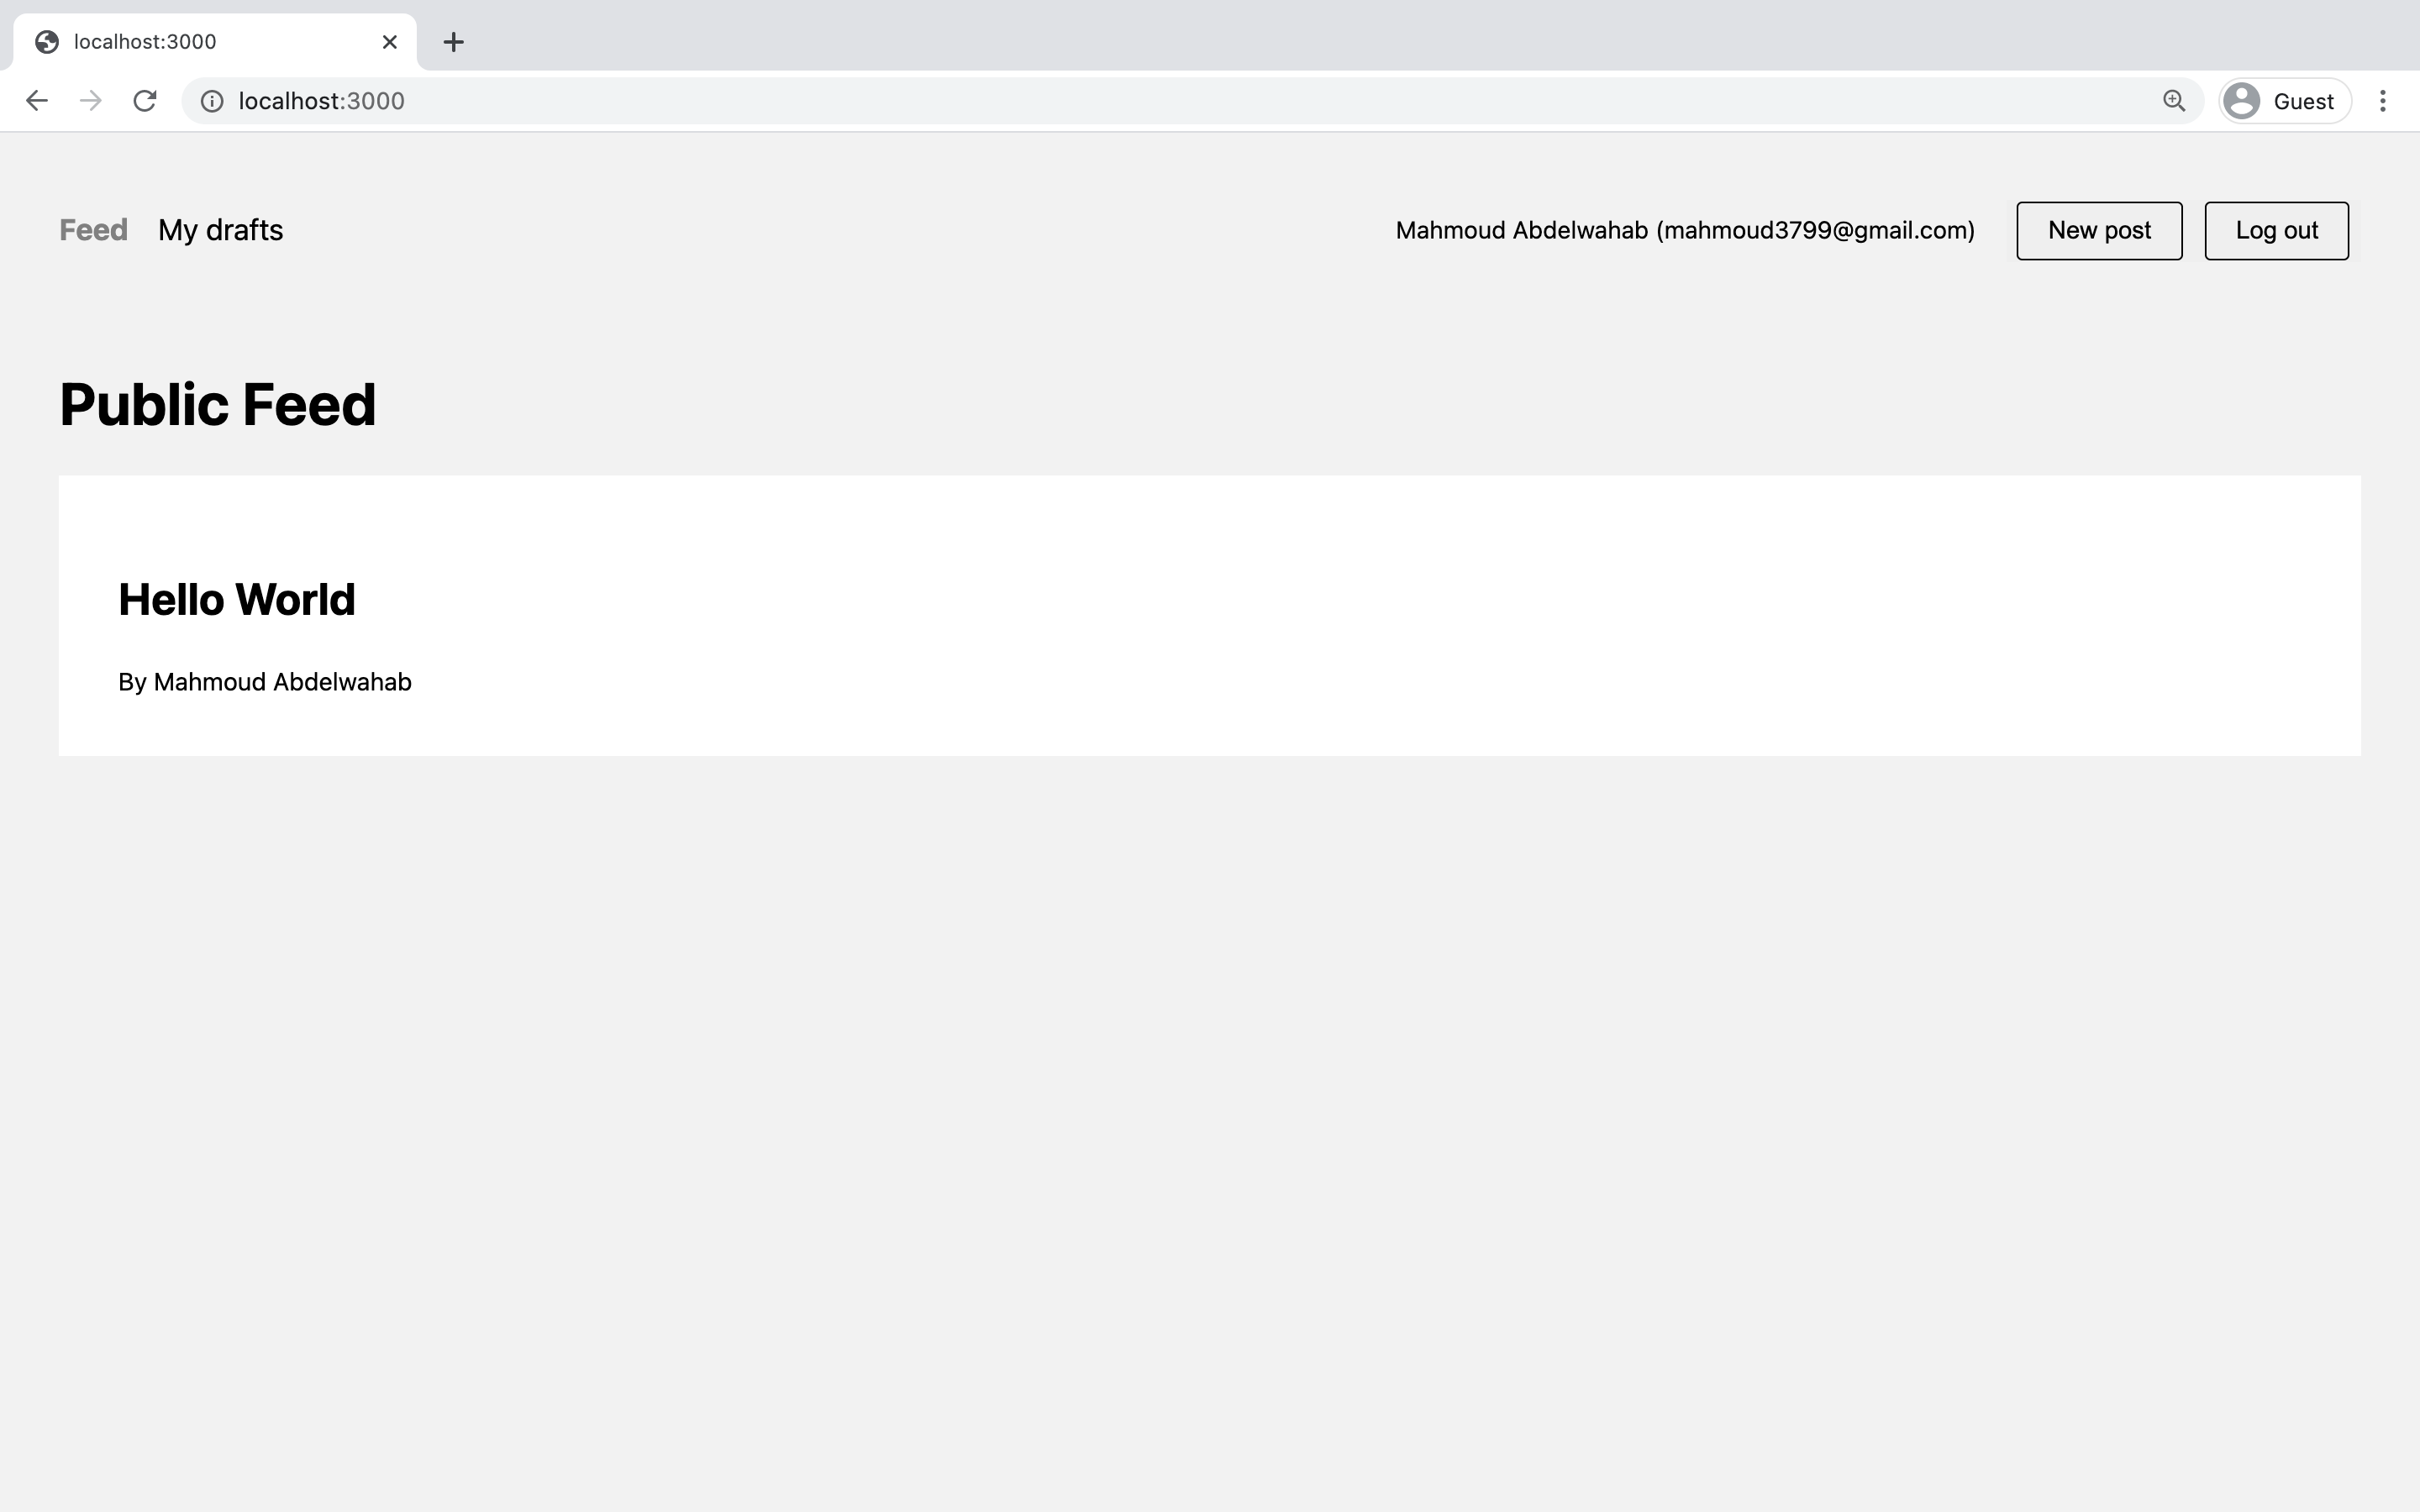
npm run dev.The header layout has now changed to display the buttons for authenticated users.
Step 8. Add new post functionality
In this step, you'll implement a way for a user to create a new post. The user can use this feature by clicking the New post button once they're authenticated.
The button already forwards to the /create route, however, this currently leads to a 404 because that route is not implemented yet.
To fix that, create a new file in the pages directory that's called create.tsx:
touch pages/create.tsxNow, add the following code to the newly created file:
import React, { useState } from 'react';import Layout from '../components/Layout';import Router from 'next/router';
const Draft: React.FC = () => {  const [title, setTitle] = useState('');  const [content, setContent] = useState('');
  const submitData = async (e: React.SyntheticEvent) => {    e.preventDefault();    // TODO    // You will implement this next ...  };
  return (    <Layout>      <div>        <form onSubmit={submitData}>          <h1>New Draft</h1>          <input            autoFocus            onChange={(e) => setTitle(e.target.value)}            placeholder="Title"            type="text"            value={title}          />          <textarea            cols={50}            onChange={(e) => setContent(e.target.value)}            placeholder="Content"            rows={8}            value={content}          />          <input disabled={!content || !title} type="submit" value="Create" />          <a className="back" href="#" onClick={() => Router.push('/')}>            or Cancel          </a>        </form>      </div>      <style jsx>{`        .page {          background: var(--geist-background);          padding: 3rem;          display: flex;          justify-content: center;          align-items: center;        }
        input[type='text'],        textarea {          width: 100%;          padding: 0.5rem;          margin: 0.5rem 0;          border-radius: 0.25rem;          border: 0.125rem solid rgba(0, 0, 0, 0.2);        }
        input[type='submit'] {          background: #ececec;          border: 0;          padding: 1rem 2rem;        }
        .back {          margin-left: 1rem;        }      `}</style>    </Layout>  );};
export default Draft;This page is wrapped by the Layout component so that it still includes the Header and any other generic UI components.
It renders a form with several input fields. When submitted, the (right now empty) submitData function is called. In that function, you need to pass the data from the React component to an API route which can then handle the actual storage of the new post data in the database.
Here's how you can implement the function:
const submitData = async (e: React.SyntheticEvent) => { e.preventDefault(); try { const body = { title, content }; await fetch('/api/post', { method: 'POST', headers: { 'Content-Type': 'application/json' }, body: JSON.stringify(body), }); await Router.push('/drafts'); } catch (error) { console.error(error); }};In this code, you're using the title and content properties that are extracted from the component state using useState and submit them via an HTTP POST request to the api/post API route.
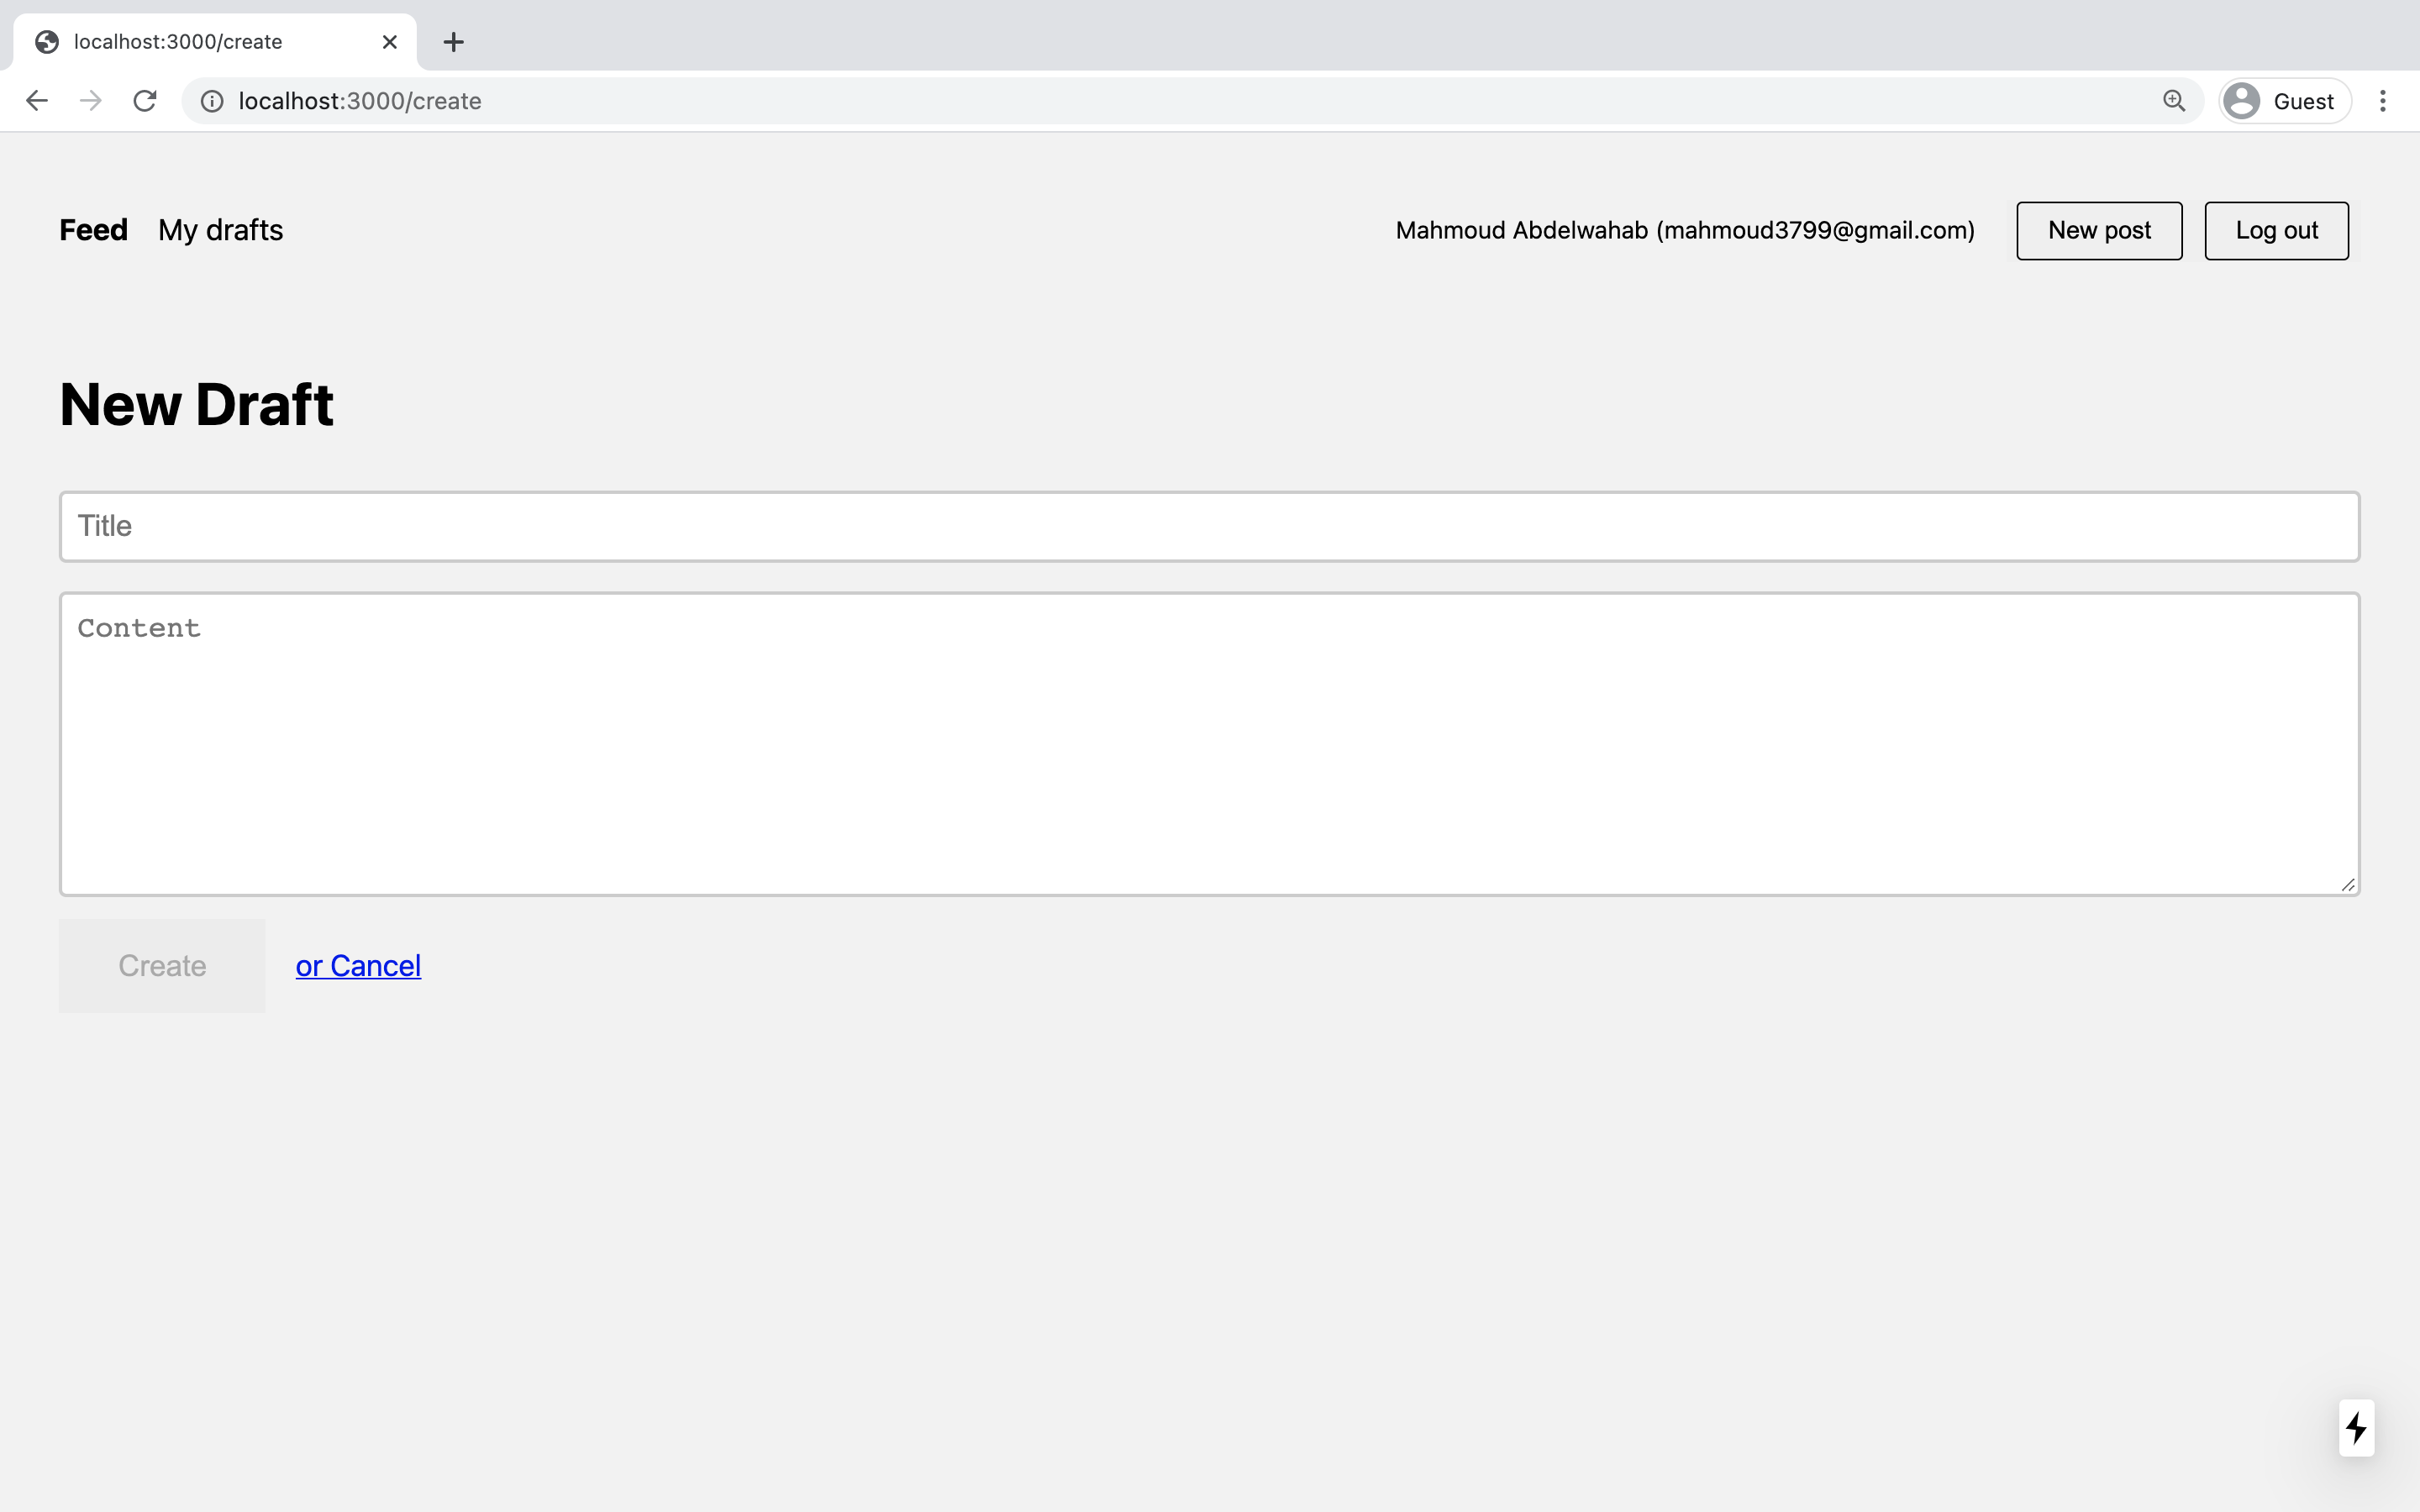
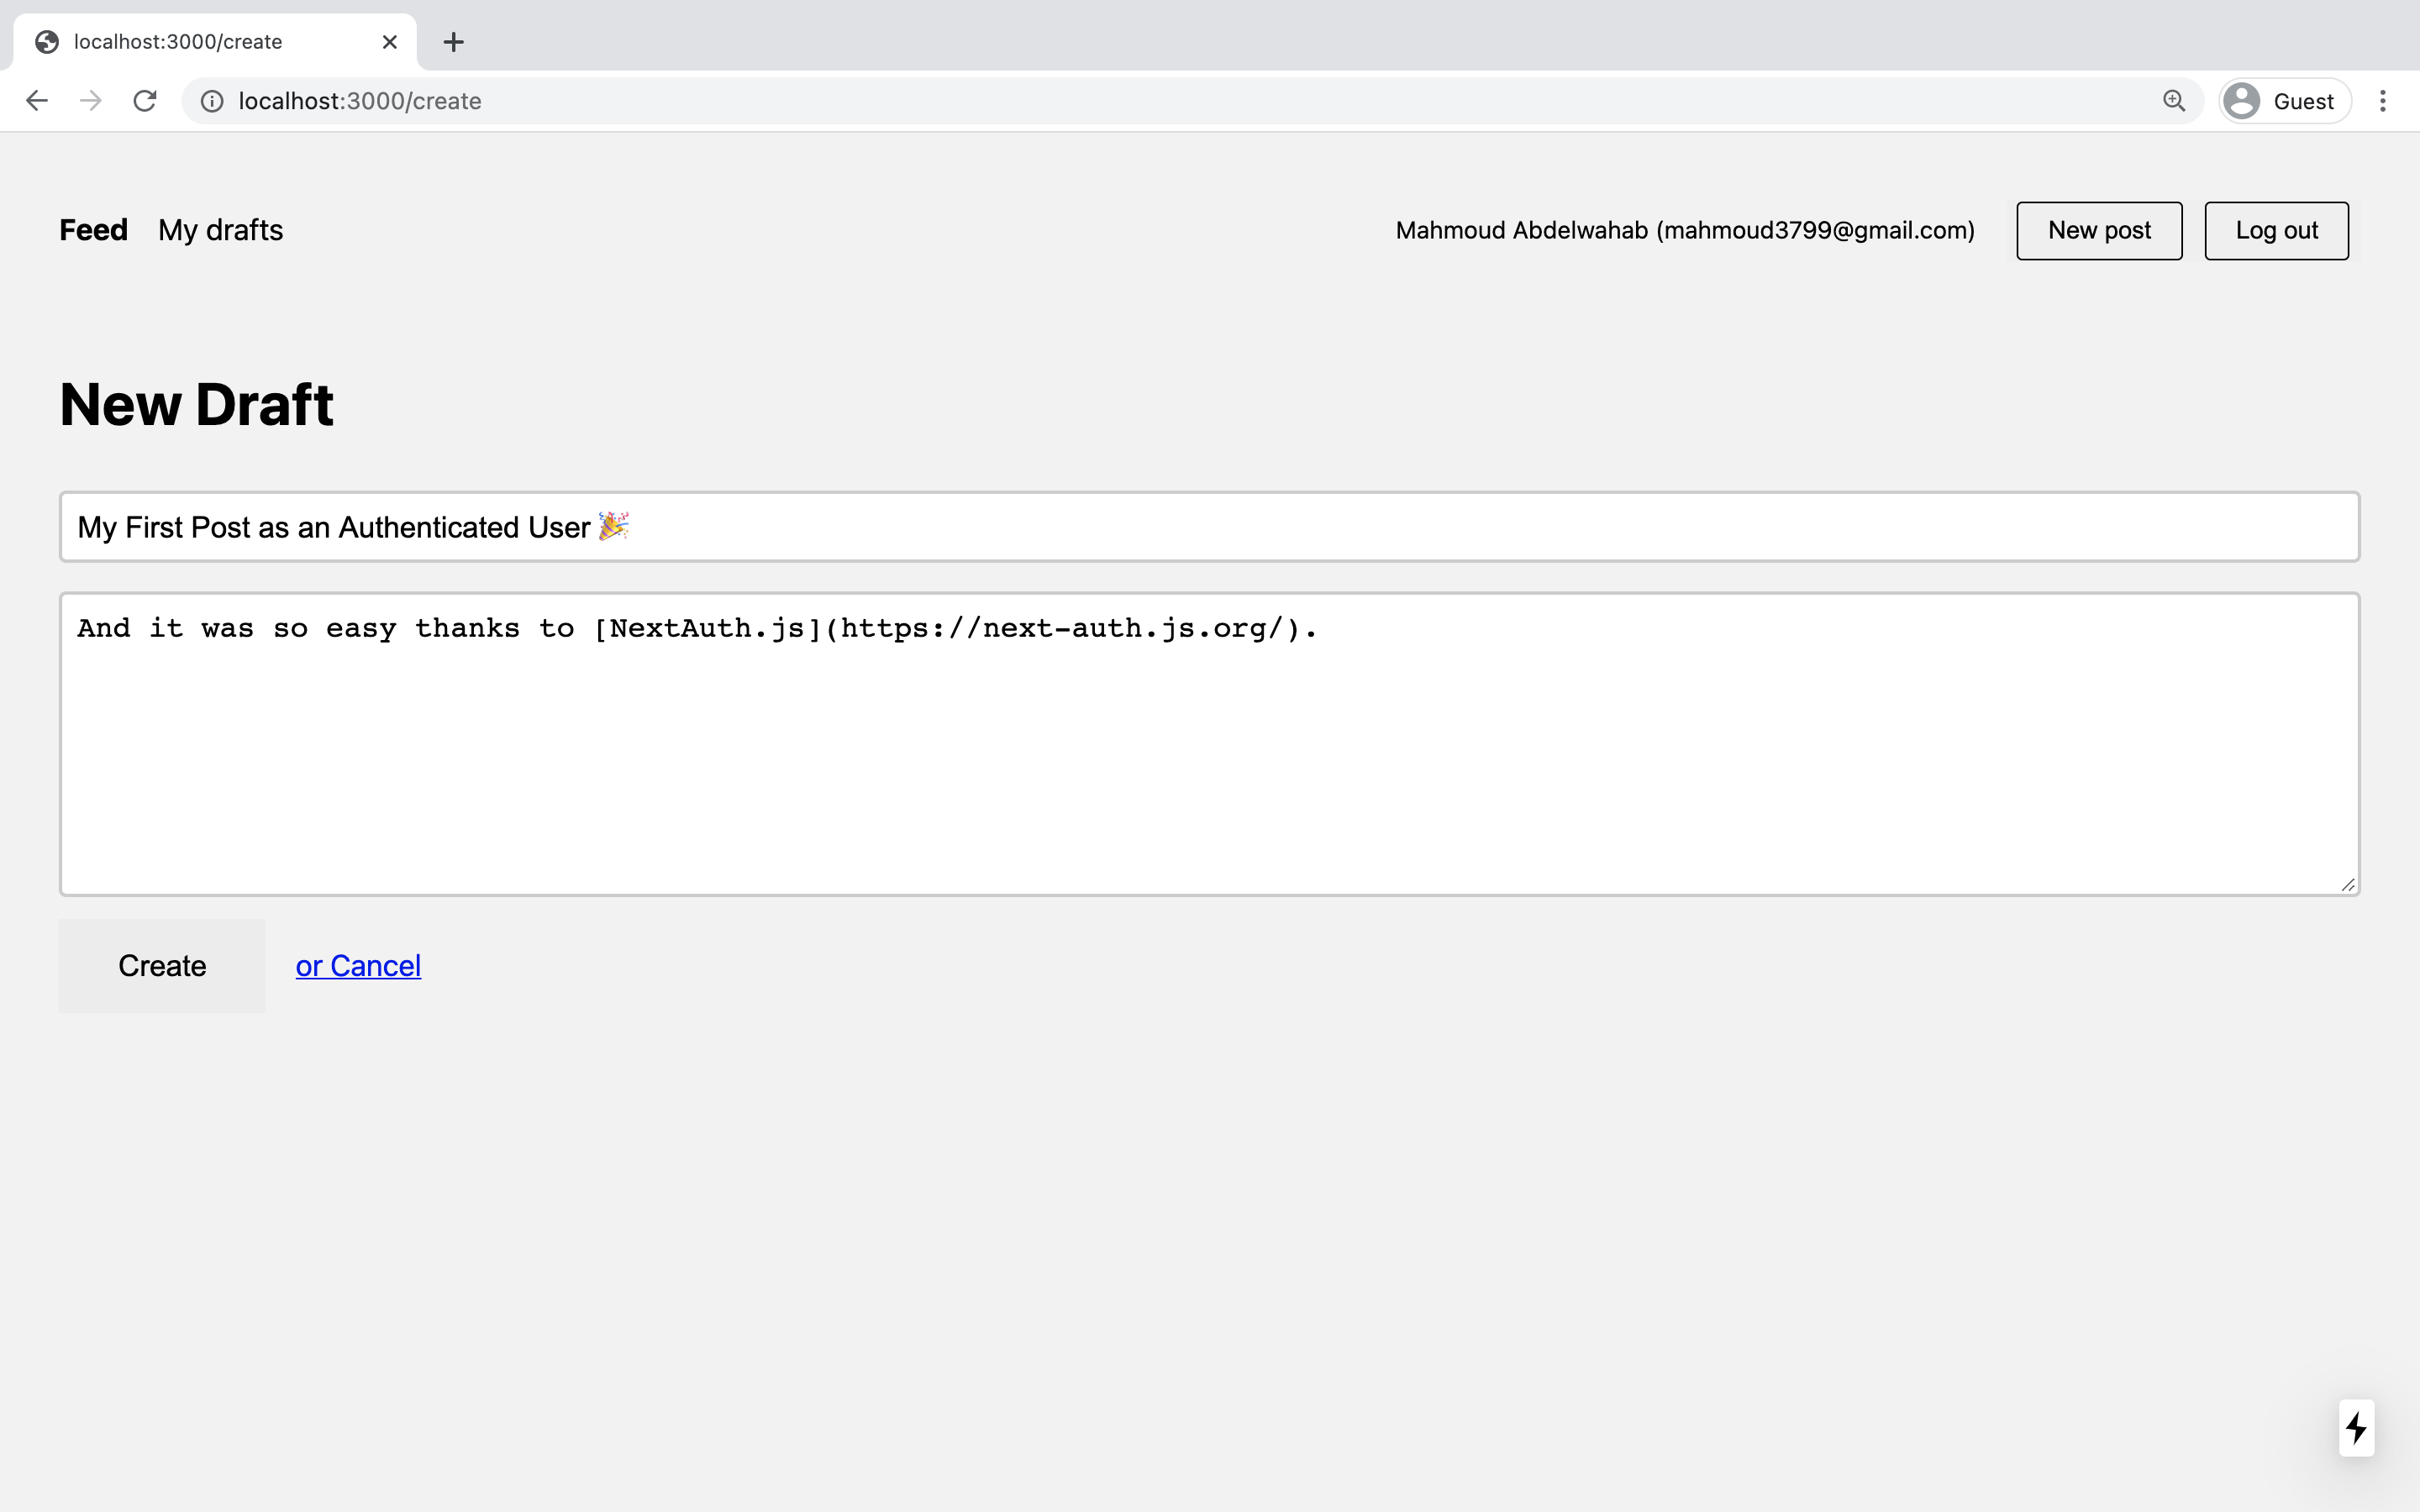
Afterwards, you're redirecting the user to the /drafts page so that they can immediately see their newly created draft. If you run the app, the /create route renders the following UI:
Note however that the implementation doesn't quite work yet because neither api/post nor the /drafts route exist so far. You'll implement these next.
First, let's make sure your backend can handle the POST request that's submitted by the user. Thanks to the Next.js API routes feature, you don't have to "leave your Next.js app" to implement such functionality but instead you can add it to your pages/api directory.
Create a new directory called post with a new file called index.ts:
mkdir -p pages/api/post && touch pages/api/post/index.tspages/api/post.ts` instead of taking the detour with an extra directory and an index.ts file. The reason why you're not doing it that way is because you'll need to add a dynamic route for HTTP DELETE requests at the api/post route later as well. In order to save some refactoring later, you're already structuring the files in the required way.Now, add the following code to pages/api/post/index.ts:
import { getSession } from 'next-auth/react';import prisma from '../../../lib/prisma';
// POST /api/post// Required fields in body: title// Optional fields in body: contentexport default async function handle(req, res) {  const { title, content } = req.body;
const session = await getSession({ req }); const result = await prisma.post.create({ data: { title: title, content: content, author: { connect: { email: session?.user?.email } }, }, }); res.json(result);}This code implements the handler function for any requests coming in at the /api/post/ route. The implementation does the following: First it extracts the title and cotent from the body of the incoming HTTP POST request. After that, it checks whether the request is coming from an authenticated user with the getSession helper function from NextAuth.js. And finally, it uses Prisma Client to create a new Post record in the database.
You can now test this functionality by opening the app, making sure you're authenticated and create a new post with title and content:
Once you click Create, the Post record will be added to the database. Note that the /drafts route that you're being redirected to right after the creation still renders a 404, that will be fixed soon. However, if you run Prisma Studio again with npx prisma studio, you'll see that the new Post record has been added to the database.
Step 9. Add drafts functionality
In this step, you'll add a new page to the app that allows an authenticated user to view their current drafts.
This page can't be statically rendered because it depends on a user who is authenticated. Pages like this that get their data dynamically based on an authenticated users are a great use case for server-side rendering (SSR) via getServerSideProps.
First, create a new file in the pages directory and call it drafts.tsx:
touch pages/drafts.tsxNext, add the following code to that file:
import React from 'react';import { GetServerSideProps } from 'next';import { useSession, getSession } from 'next-auth/react';import Layout from '../components/Layout';import Post, { PostProps } from '../components/Post';import prisma from '../lib/prisma';
export const getServerSideProps: GetServerSideProps = async ({ req, res }) => {  const session = await getSession({ req });  if (!session) {    res.statusCode = 403;    return { props: { drafts: [] } };  }
  const drafts = await prisma.post.findMany({    where: {      author: { email: session.user.email },      published: false,    },    include: {      author: {        select: { name: true },      },    },  });  return {    props: { drafts },  };};
type Props = {  drafts: PostProps[];};
const Drafts: React.FC<Props> = (props) => {  const { data: session } = useSession();
  if (!session) {    return (      <Layout>        <h1>My Drafts</h1>        <div>You need to be authenticated to view this page.</div>      </Layout>    );  }
  return (    <Layout>      <div className="page">        <h1>My Drafts</h1>        <main>          {props.drafts.map((post) => (            <div key={post.id} className="post">              <Post post={post} />            </div>          ))}        </main>      </div>      <style jsx>{`        .post {          background: var(--geist-background);          transition: box-shadow 0.1s ease-in;        }
        .post:hover {          box-shadow: 1px 1px 3px #aaa;        }
        .post + .post {          margin-top: 2rem;        }      `}</style>    </Layout>  );};
export default Drafts;In this React component, you're rendering a list of "drafts" of the authenticated user. The drafts are retrieved from the database during server-side rendering, because the database query with Prisma Client is executed in getServerSideProps. The data is then made available to the React component via its props.
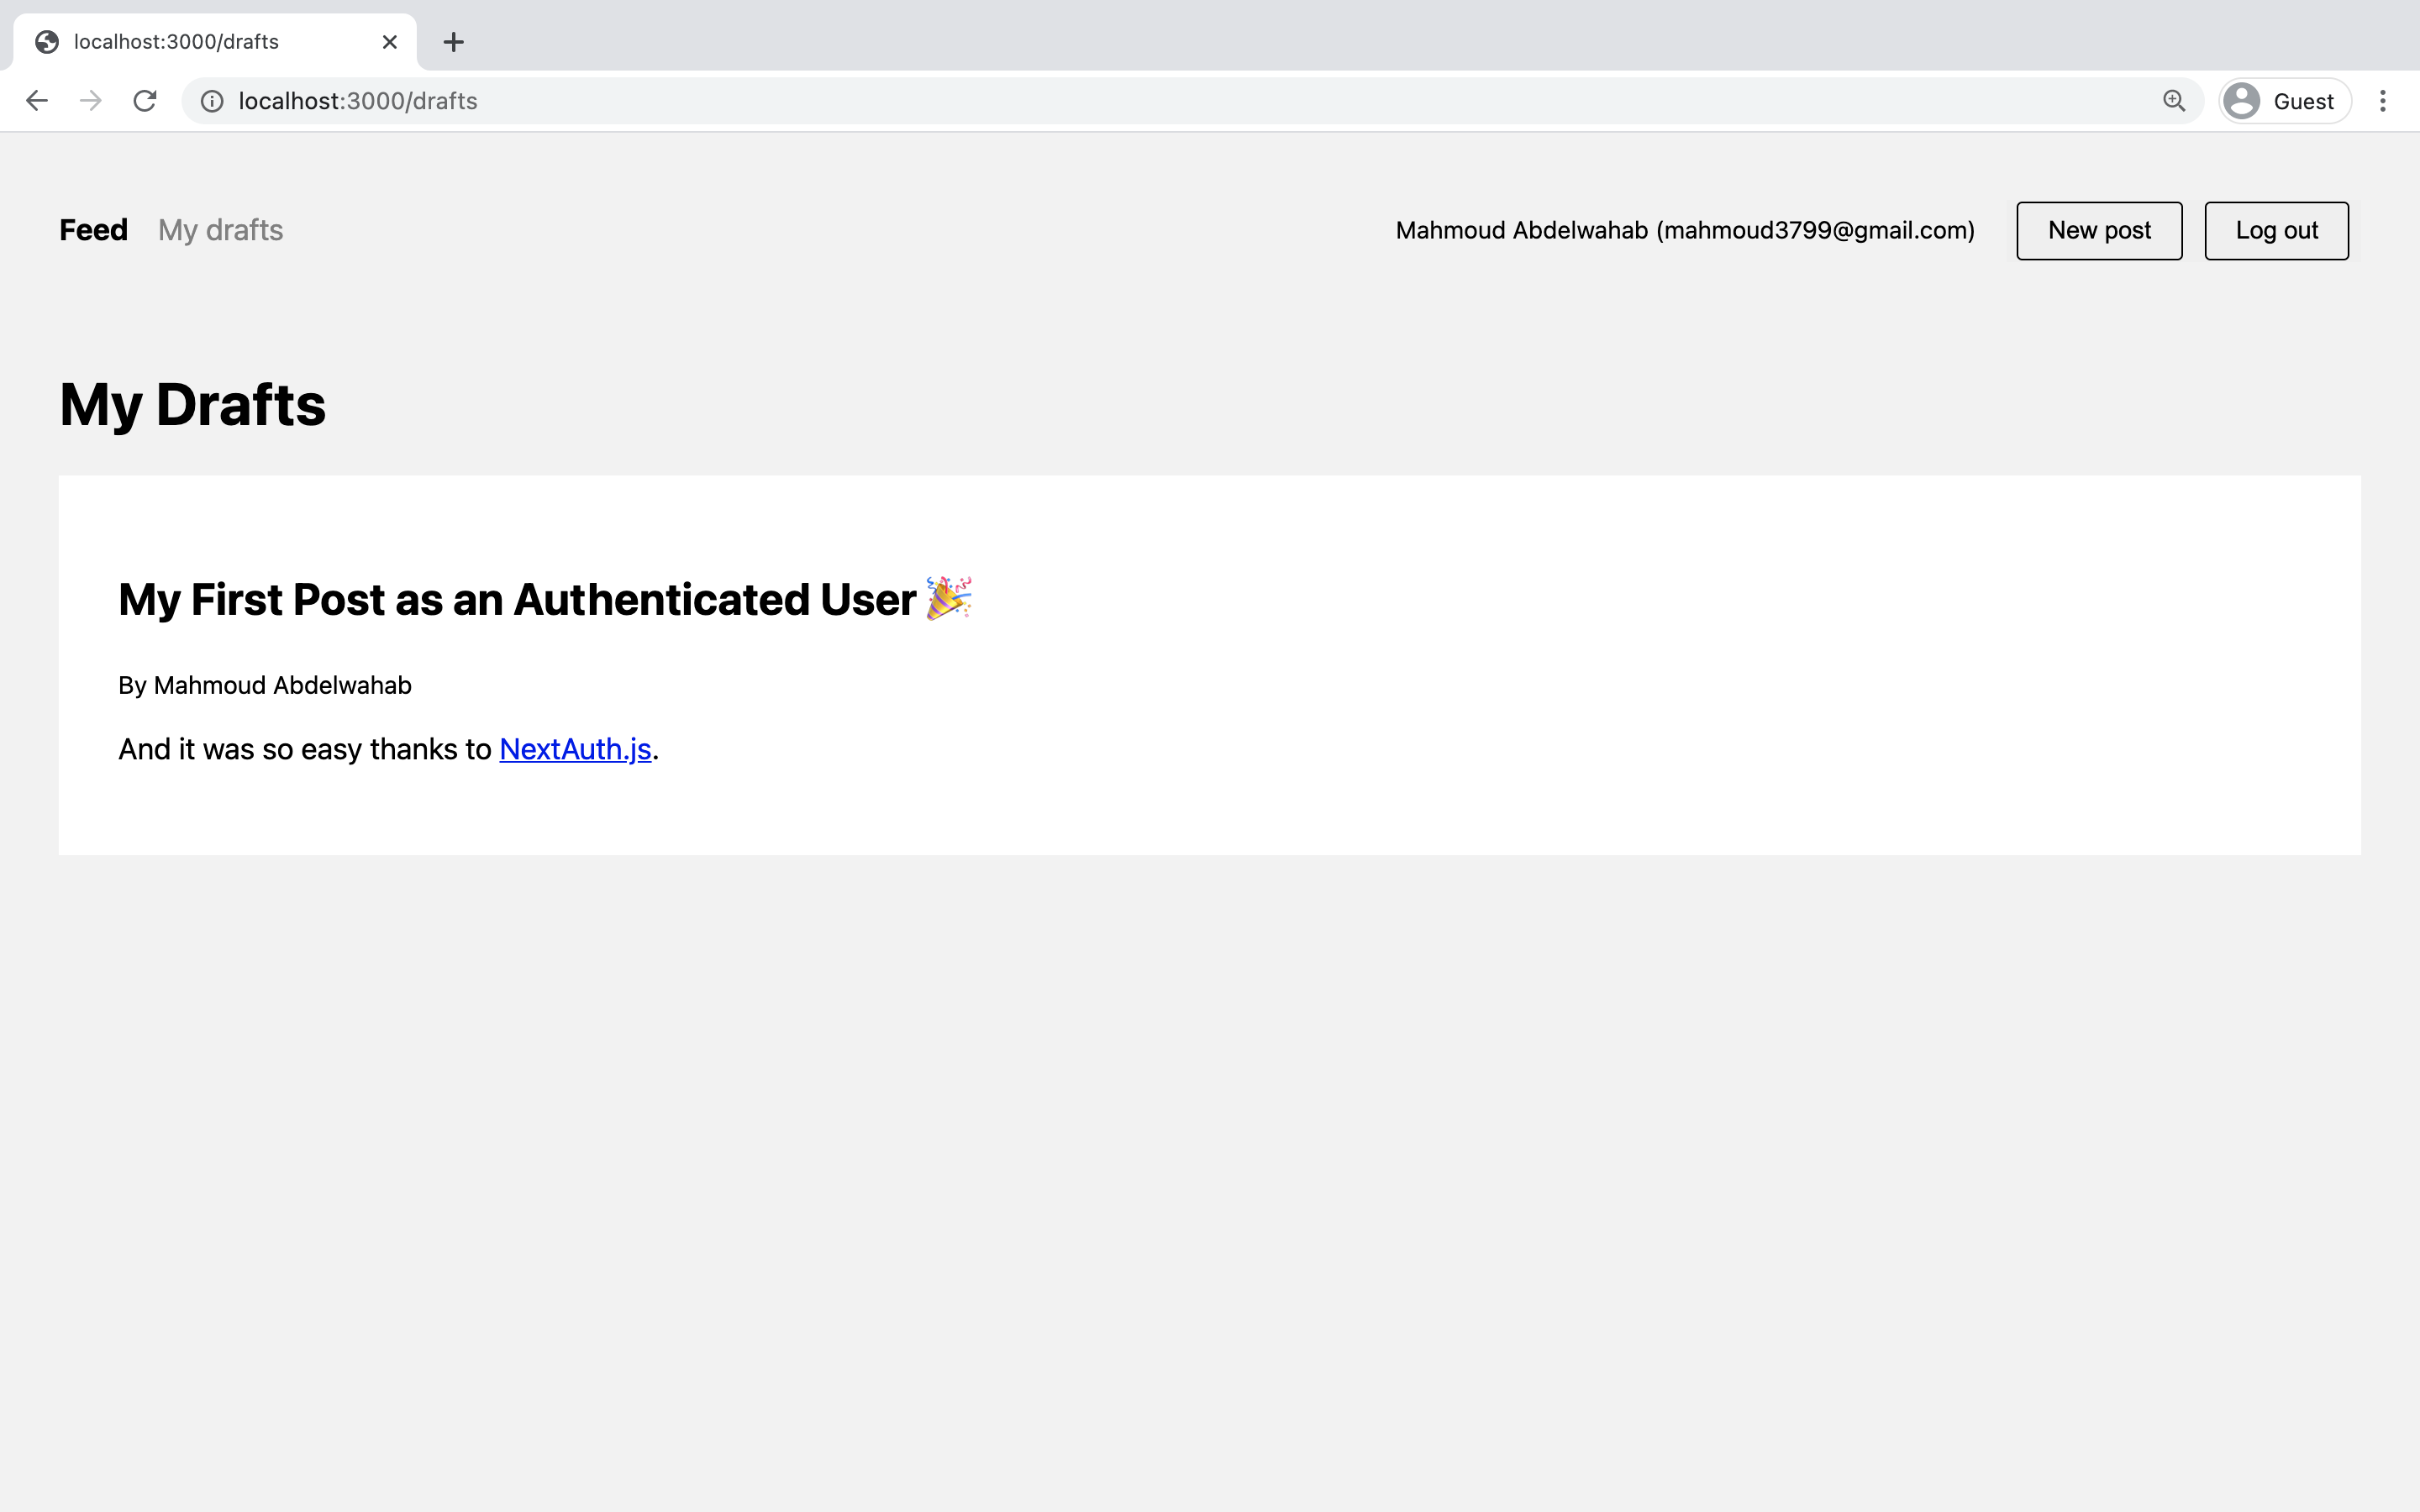
If you now navigate to the My drafts section of the app, you'll see the unpublished post that you created before:
Step 10. Add Publish functionality
To "move" the draft to the public feed view, you need to be able to "publish" it – that is, setting the published field of a Post record to true. This functionality will be implemented in the post detail view that currently lives in pages/p/[id].tsx.
The functionality will be implemented via an HTTP PUT request that'll be sent to a api/publish route in your "Next.js backend". Go ahead and implement that route first.
Create a new directory inside the pages/api directory called publish. Then create a new file called [id].ts in the new directory:
mkdir -p pages/api/publish && touch pages/api/publish/[id].tsNow, add the following code to the newly created file:
import prisma from '../../../lib/prisma';
// PUT /api/publish/:idexport default async function handle(req, res) { const postId = req.query.id; const post = await prisma.post.update({ where: { id: postId }, data: { published: true }, }); res.json(post);}This is the implementation of an API route handler which retrieves the ID of a Post from the URL and then uses Prisma Client's update method to set the published field of the Post record to true.
Next, you'll implement the functionality on the frontend in the pages/p/[id].tsx file. Open up the file and replace its contents with the following:
import React from 'react';import { GetServerSideProps } from 'next';import ReactMarkdown from 'react-markdown';import Router from 'next/router';import Layout from '../../components/Layout';import { PostProps } from '../../components/Post';import { useSession } from 'next-auth/react';import prisma from '../../lib/prisma';
export const getServerSideProps: GetServerSideProps = async ({ params }) => {  const post = await prisma.post.findUnique({    where: {      id: String(params?.id),    },    include: {      author: {        select: { name: true, email: true },      },    },  });  return {    props: post,  };};
async function publishPost(id: string): Promise<void> {  await fetch(`/api/publish/${id}`, {    method: 'PUT',  });  await Router.push('/');}
const Post: React.FC<PostProps> = (props) => {  const { data: session, status } = useSession();  if (status === 'loading') {    return <div>Authenticating ...</div>;  }  const userHasValidSession = Boolean(session);  const postBelongsToUser = session?.user?.email === props.author?.email;  let title = props.title;  if (!props.published) {    title = `${title} (Draft)`;  }
  return (    <Layout>      <div>        <h2>{title}</h2>        <p>By {props?.author?.name || 'Unknown author'}</p>        <ReactMarkdown children={props.content} />        {!props.published && userHasValidSession && postBelongsToUser && (          <button onClick={() => publishPost(props.id)}>Publish</button>        )}      </div>      <style jsx>{`        .page {          background: var(--geist-background);          padding: 2rem;        }
        .actions {          margin-top: 2rem;        }
        button {          background: #ececec;          border: 0;          border-radius: 0.125rem;          padding: 1rem 2rem;        }
        button + button {          margin-left: 1rem;        }      `}</style>    </Layout>  );};
export default Post;This code adds the publishPost function to the React component which is responsible for sending the HTTP PUT request to the API route you just implemented. The render function of the component is also adjusted to check whether the user is authenticated, and if that's the case, it'll display the Publish button in the post detail view as well:
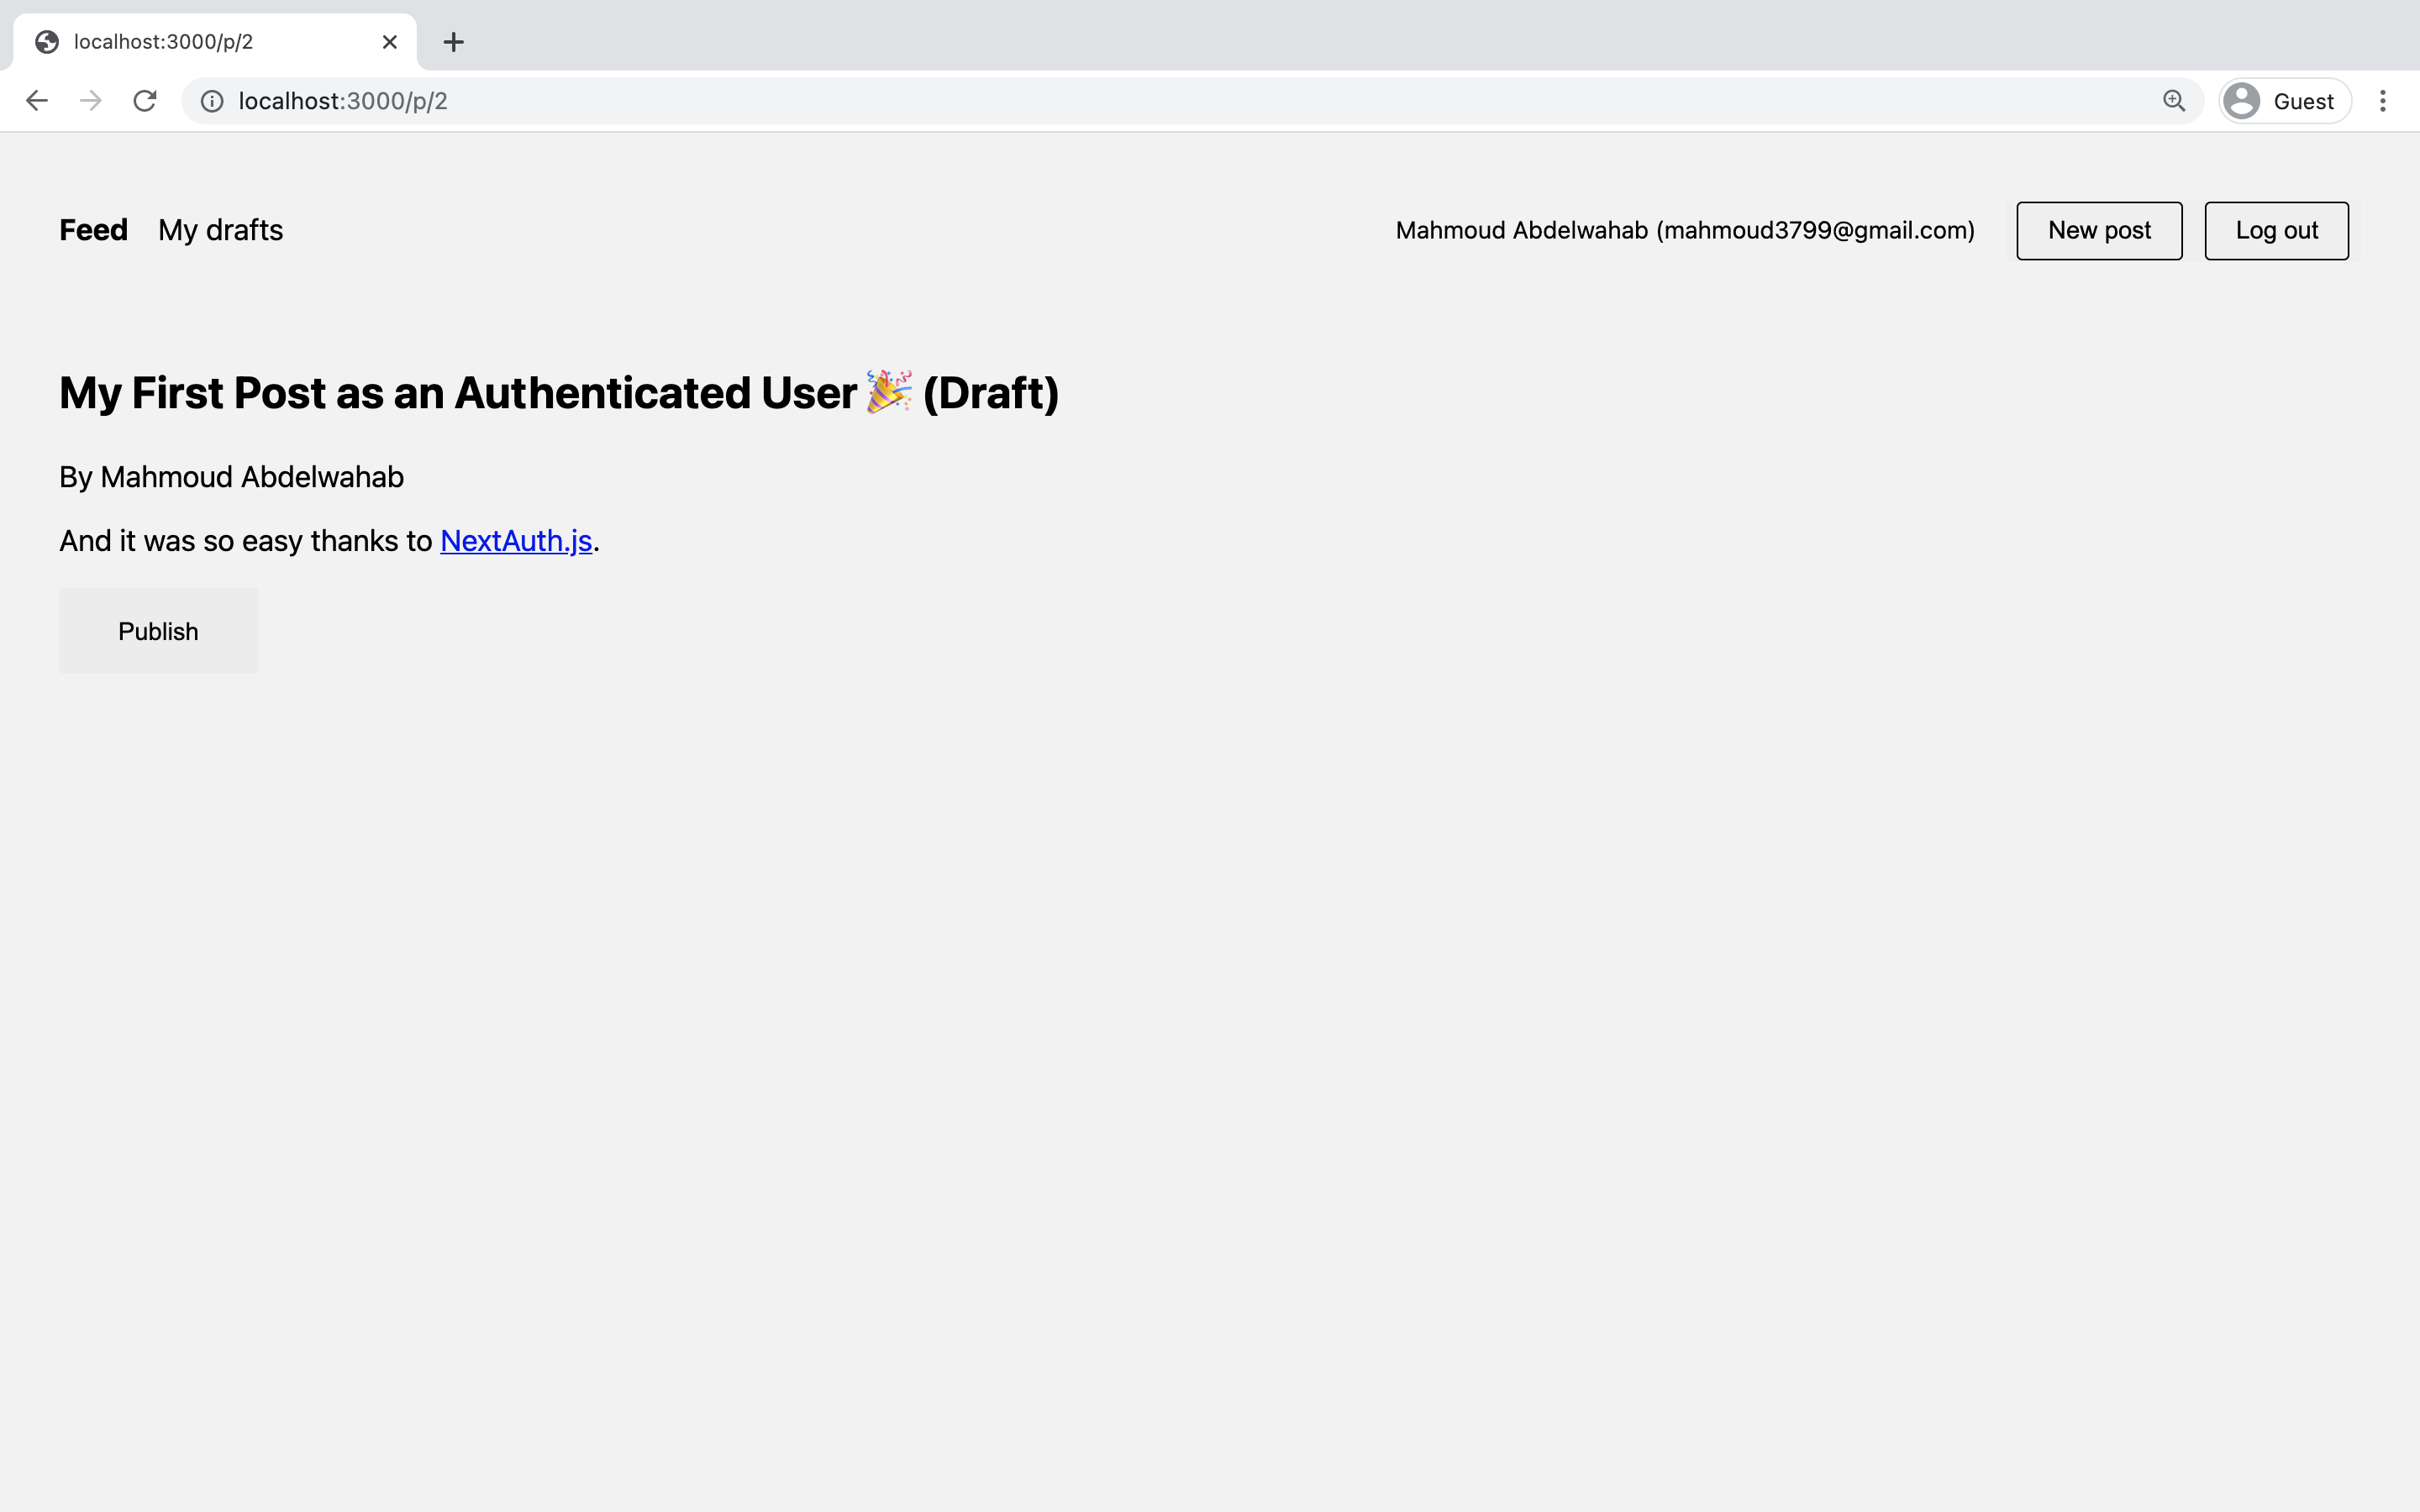
If you click the button, you will be redirected to the public feed and the post will be displayed there!
getStaticProps to retrieve the data for this view with Incremental Static Regeneration. If you want data to be updated "immediately", consider using On-Demand Incremental Static Regeneration.Step 11. Add Delete functionality
The last piece of functionality you'll implement in this guide is to enable users to delete existing Post records. You'll follow a similar approach as for the "publish" functionality by first implementing the API route handler on the backend, and then adjust your frontend to make use of the new route!
Create a new file in the pages/api/post directory and call it [id].ts:
touch pages/api/post/[id].tsNow, add the following code to it:
import prisma from '../../../lib/prisma';
// DELETE /api/post/:idexport default async function handle(req, res) { const postId = req.query.id; if (req.method === 'DELETE') { const post = await prisma.post.delete({ where: { id: postId }, }); res.json(post); } else { throw new Error( `The HTTP ${req.method} method is not supported at this route.`, ); }}This code handles HTTP DELETE requests that are coming in via the /api/post/:id URL. The route handler then retrieves the id of the Post record from the URL and uses Prisma Client to delete this record in the database.
To make use of this feature on the frontend, you again need to adjust the post detail view. Open pages/p/[id].tsx and insert the following function right below the publishPost function:
async function deletePost(id: string): Promise<void> { await fetch(`/api/post/${id}`, { method: 'DELETE', }); Router.push('/');}Now, you can follow a similar approach with the Delete button as you did with the Publish button and render it only if the user is authenticated. To achieve this, you can add this code directly in the return part of the Post component right below where the Publish button is rendered:
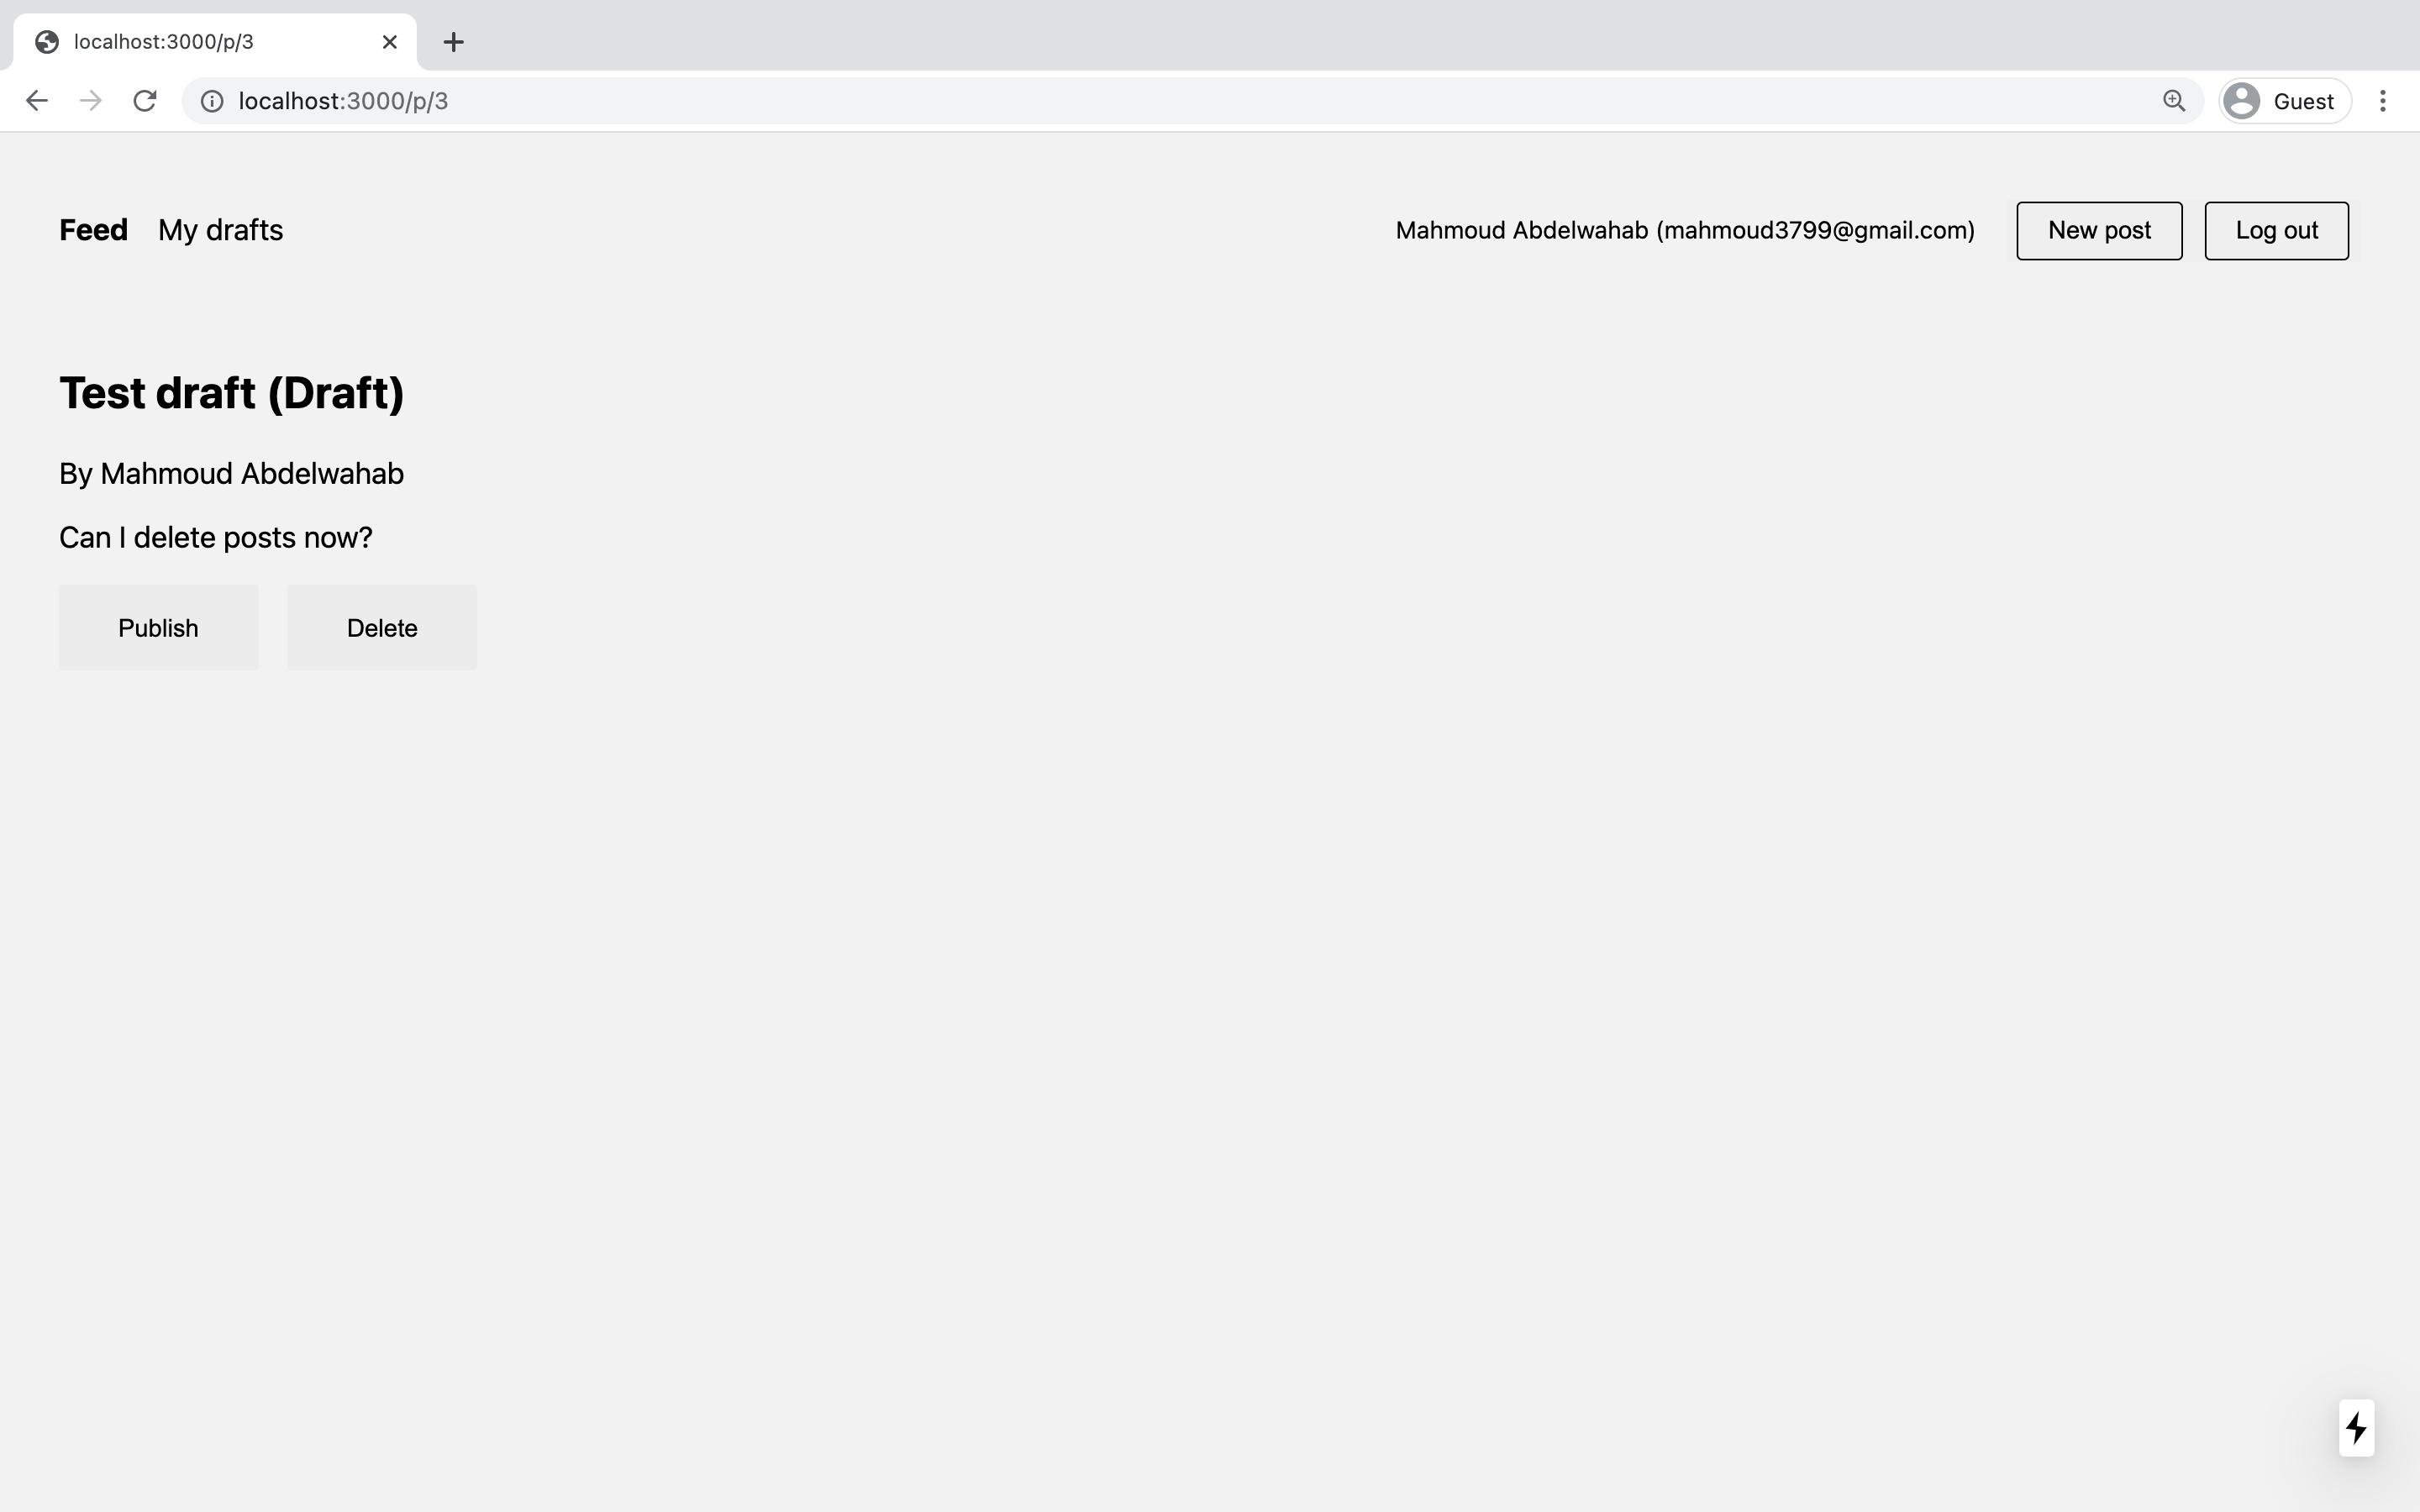
// pages/p/[id].tsx{ !props.published && userHasValidSession && postBelongsToUser && ( <button onClick={() => publishPost(props.id)}>Publish</button> );}{ userHasValidSession && postBelongsToUser && ( <button onClick={() => deletePost(props.id)}>Delete</button> );}You can now try out the new functionality by creating a new draft, navigating to its detail view and then clicking the newly appearing Delete button:
Step 12. Deploy to Vercel
In this final step, you're going to deploy the app to Vercel from a GitHub repo.
Before you can deploy, you need to:
- Create another OAuth app on GitHub
- Create a new GitHub repo and push your project to it
To start with the OAuth app, go back to step "Step 5. Set up GitHub authentication with NextAuth" and follow the steps to create another OAuth app via the GitHub UI.
This time, the Authorization Callback URL needs to match the domain of your future Vercel deployment which will be based on the Vercel project name. As a Vercel project name, you will choose blogr-nextjs-prisma prepended with your first and lastname: FIRSTNAME-LASTNAME-blogr-nextjs-prisma. For example, if you're called "Jane Doe", your project name should be jane-doe-blogr-nextjs-prisma.
The Authorization Callback URL must therefore be set to https://FIRSTNAME-LASTNAME-blogr-nextjs-prisma.vercel.app/api/auth. Once you created the application, adjust your .env file and set the Client ID as the GITHUB_ID env var and a Client secret as the GITHUB_SECRET env var. The NEXTAUTH_URL env var needs to be set to the same value as the Authorization Callback URL on GitHub: https://FIRSTNAME-LASTNAME-blogr-nextjs-prisma.vercel.app/api/auth.
Next, create a new GitHub repository with the same name, e.g. jane-doe-blogr-nextjs-prisma. Now, copy the three terminal commands from the bottom section that says ...or push an existing repository from the command line, it should look similar to this:
git remote add origin git@github.com:janedoe/jane-doe-blogr-nextjs-prisma.gitgit branch -M maingit push -u origin mainYou now should have your new repository ready at https://github.com/GITHUB_USERNAME/FIRSTNAME-LASTNAME-blogr-nextjs-prisma, e.g. https://github.com/janedoe/jane-doe-blogr-nextjs-prisma.
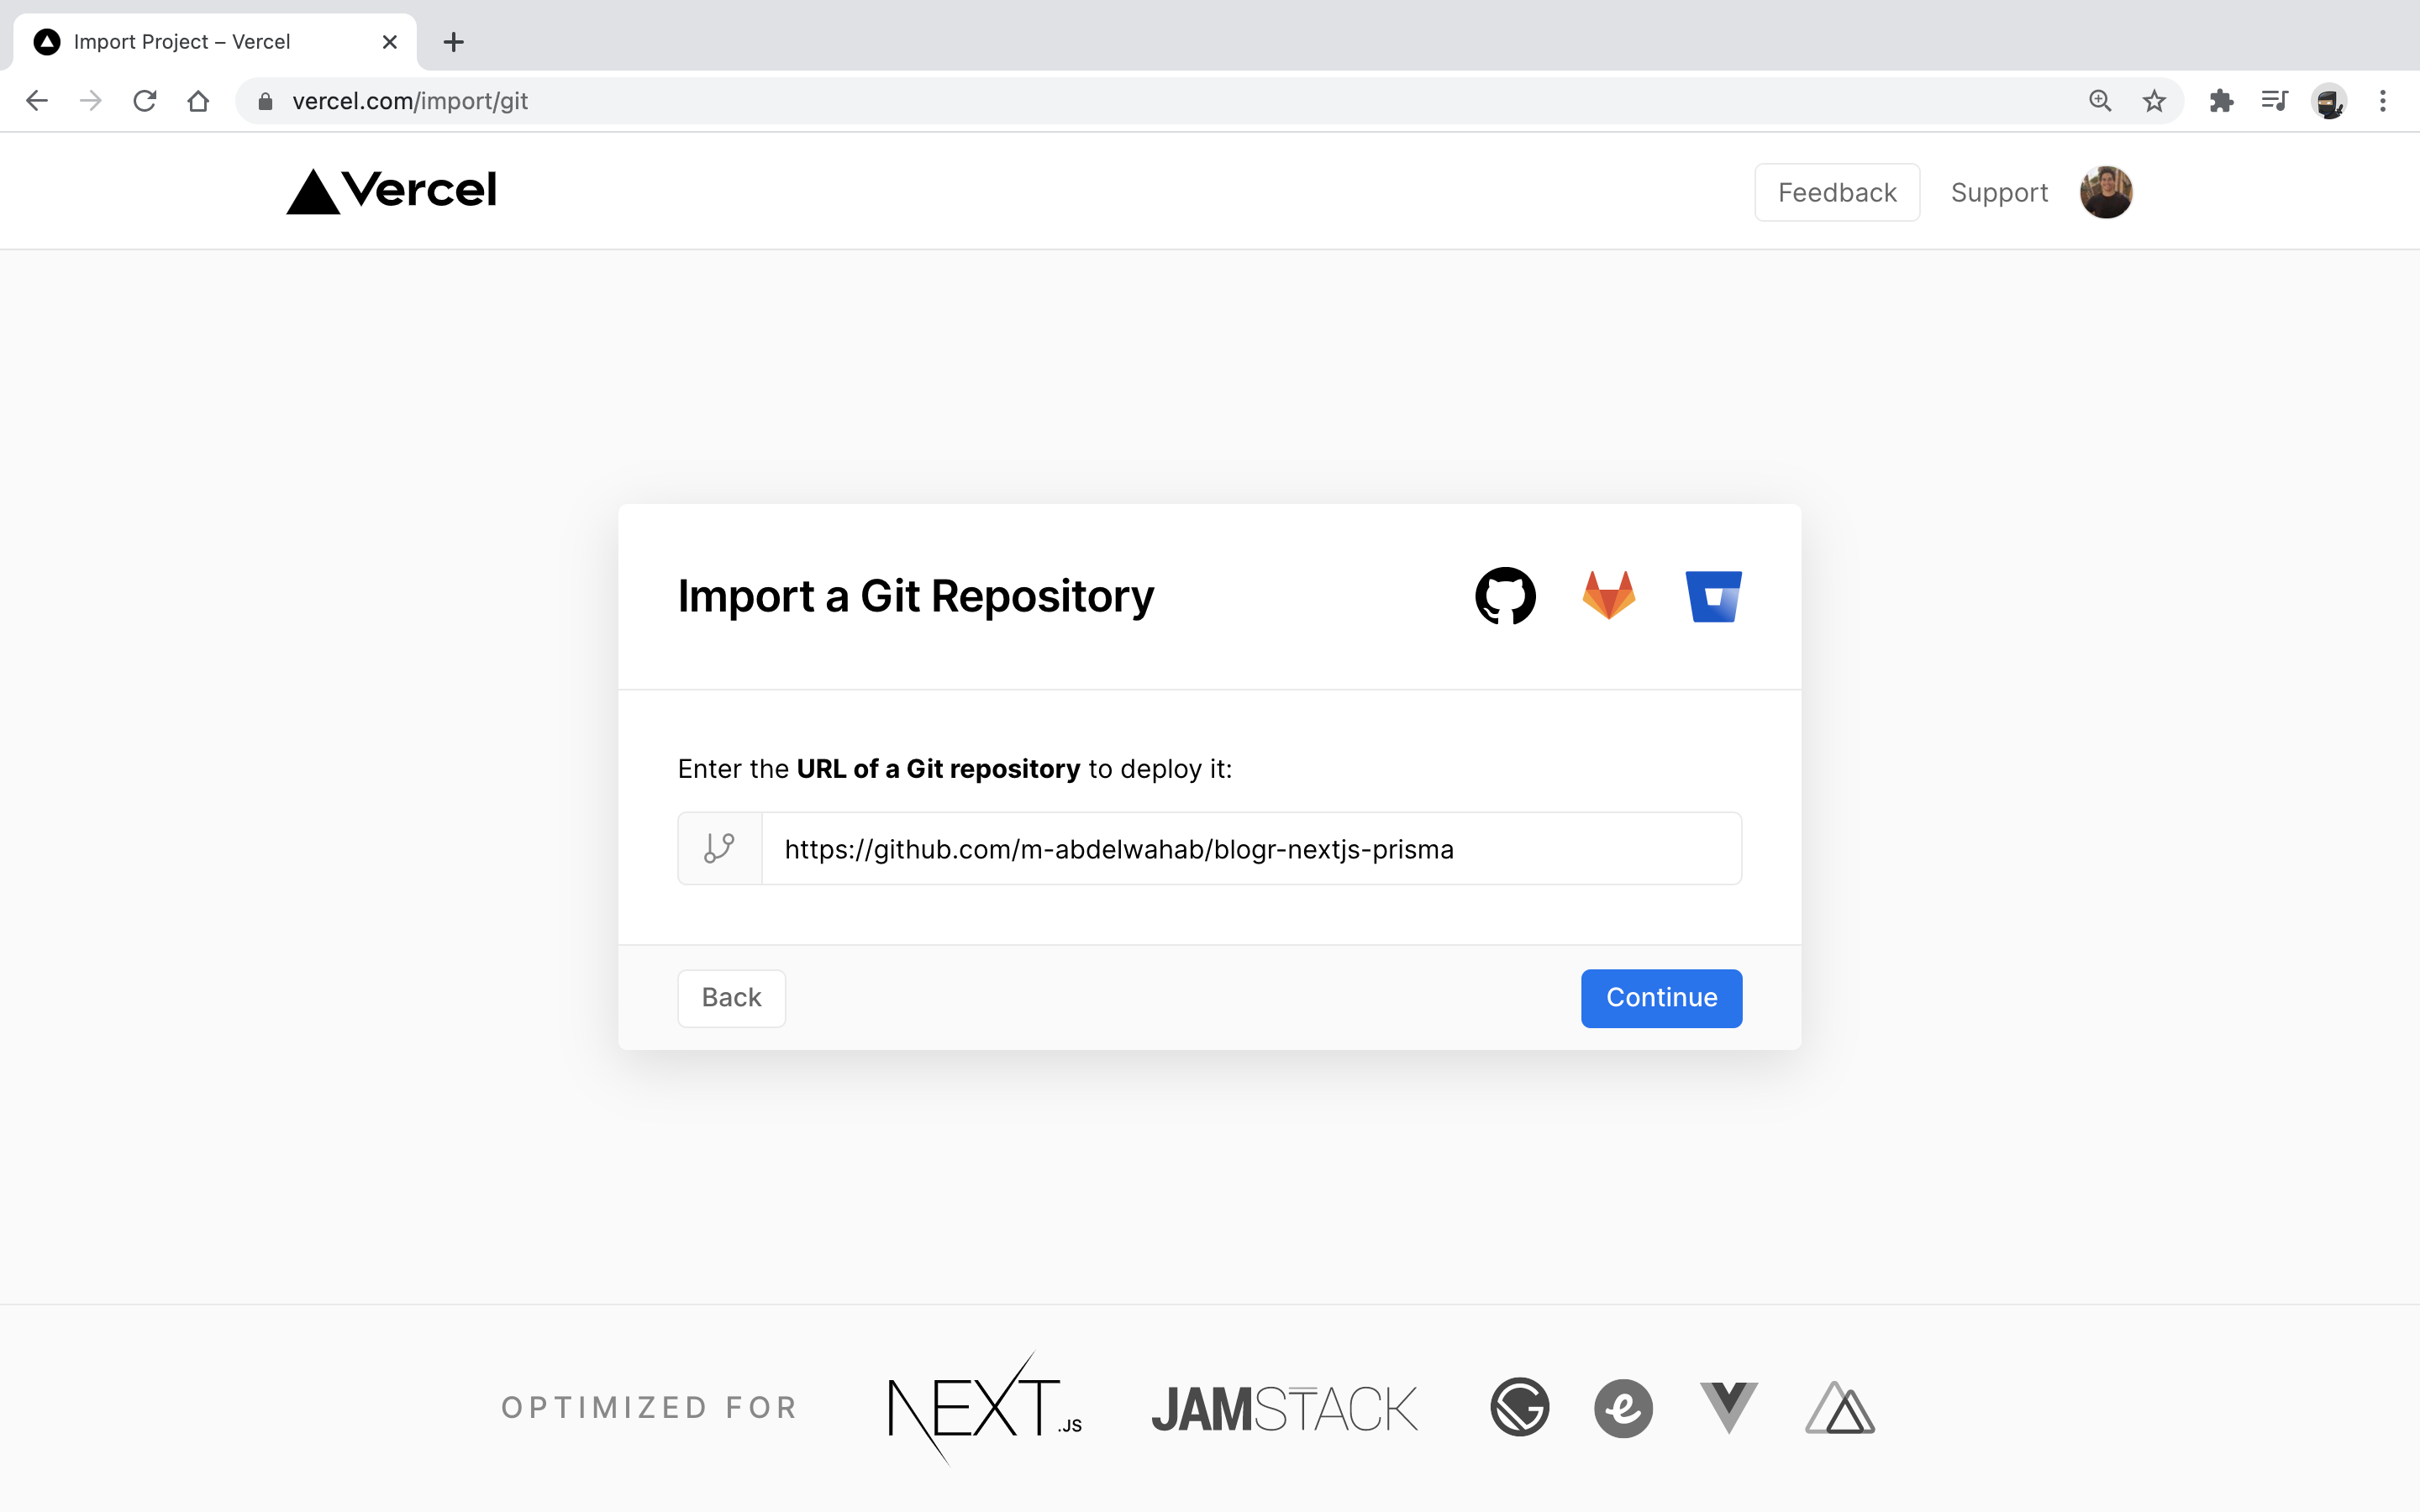
With the GitHub repo in place, you can now import it to Vercel in order to deploy the app:

Now, provide the URL of your GitHub repo in the text field:
Click Continue. The next screen requires you to set the environment variables for your production deployment:
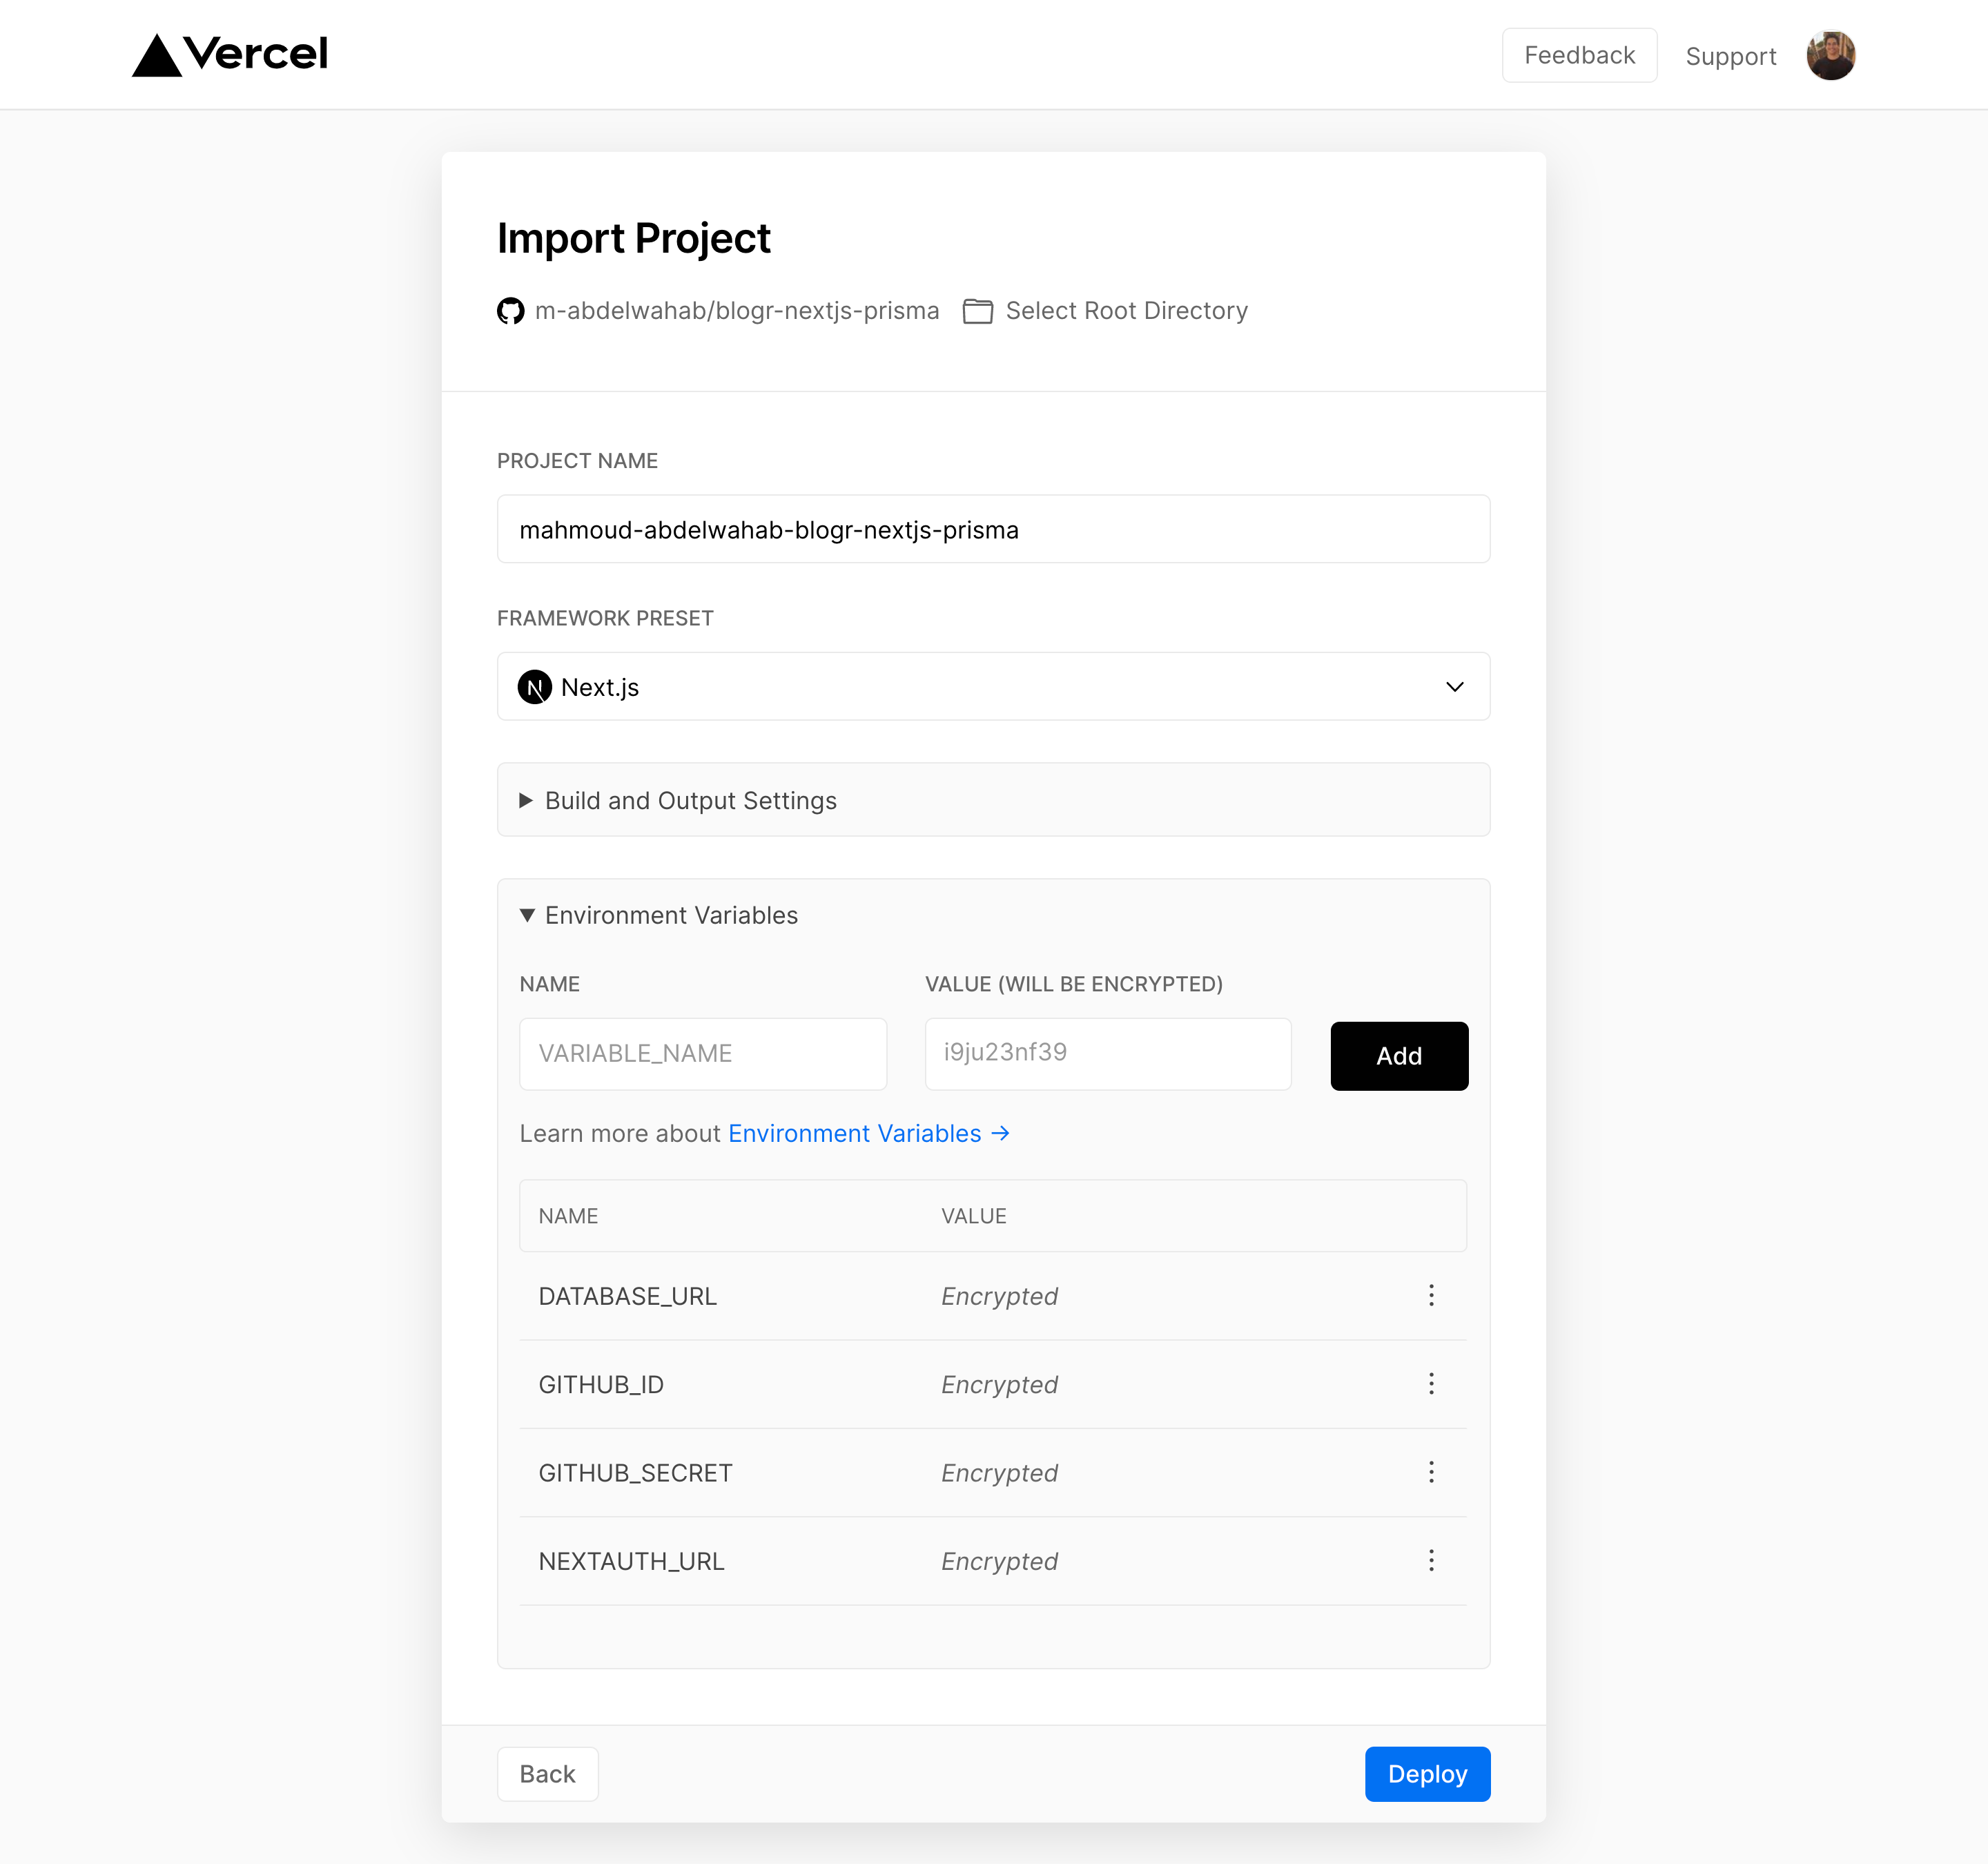
Here's what you need to provide:
GITHUB_ID: Set this to the Client ID of the GitHub OAuth app you just createdGITHUB_SECRET: Set this to the Client Secret of the GitHub OAuth app you just createdNEXTAUTH_URL: Set this to the Authorization Callback URL of the GitHub OAuth app you just createdSECRET: Set this to your own strong secret. This was not needed in development as NextAuth.js will generate one if not provided. However, you will need to provide your own value for production otherwise you will receive an error.
You'll also need to link your Vercel postgres database to this Vercel project so that all your database environment variables are automatically added. Once all environment variables are set, hit Deploy. Your app is now being deployed to Vercel. Once it's ready, Vercel will show you the following success screen:
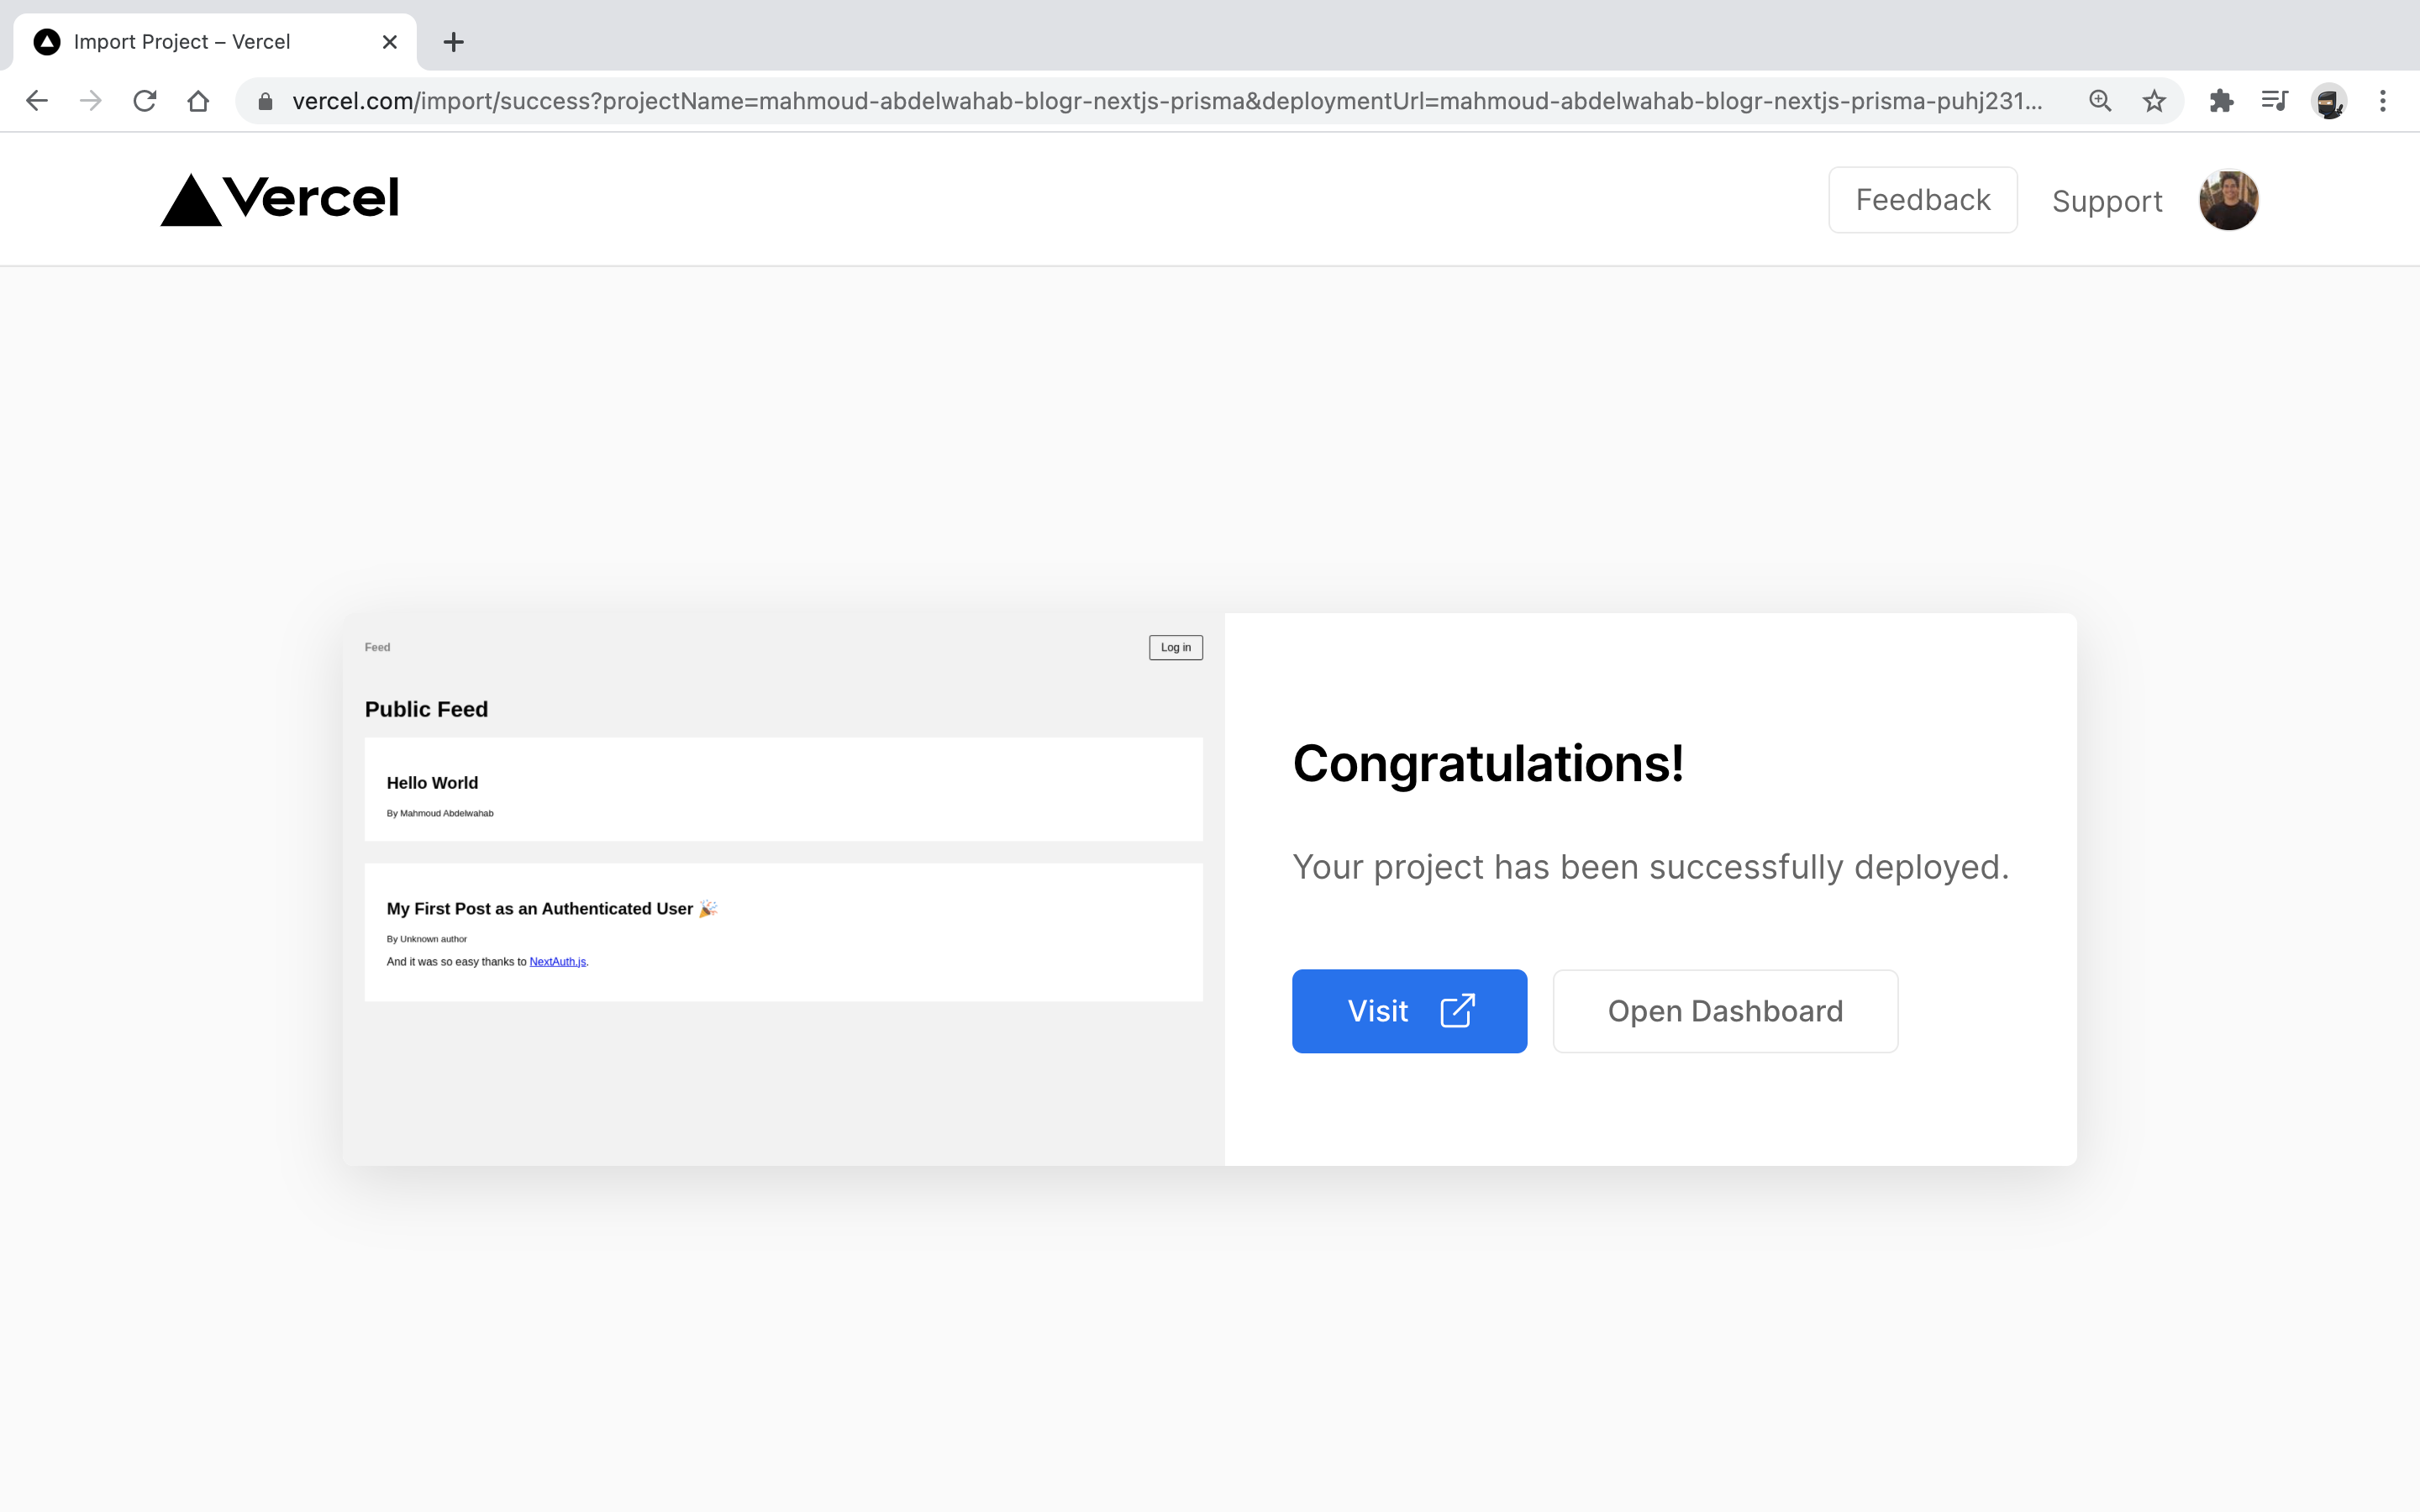
You can click the Visit button to view the deployed version of your fullstack app 🎉
Conclusion
In this guide, you learned how to build and deploy a fullstack application using Next.js, Prisma, and Vercel Postgres. If you ran into issue or have any questions about this guide, feel free to raise them on GitHub or drop them in the Prisma Slack.